The grilled coconut rice cakes (Khanom Krok) from Marnee Thai were the most memorable thing I ate during my summer vacation in San Francisco. It's a seasonal appetizer (occasionally offered at the restaurant) that is delivered to your table with quite a lot of flair. The cakes arrive still sizzling in the special cast iron griddle in which they were cooked. You watch as the wait-person loosens each cake from the pan and divvies them among your plates. They're fluffy yet glutinous and sweet. I was completely curious (and baffled) about how the texture of the pancakes was achieved, so I asked for the recipe. A day later the chef, Chai Siriyarn, emailed me a word document with complete instructions! He mentioned that Khanom Krok is a favorite street food in Thailand that is normally served for breakfast or as a snack. It's quite sweet, like coconut pudding, and depending on how you decorate with toppings, could also be considered a dessert. I topped mine with a salad made from corn and okra in my farm share and the broccoli growing (and flowering) in my garden.
Khanom Krok (Grilled Coconut Rice Cakes)
Ingredients
8 oz. rice flour (½ pound) 2 teaspoons tempura flour or all purpose flour ½ cup steamed rice (cooked very soggy until clumped) 1¼ cups coconut milk 1½ cups water ½ teaspoons salt oil for brushing the griddle
For the topping
1¼ cups coconut milk ¼ cup honey (or less depending on your sweetness preference) ½ teaspoon salt
Combine rice flour, tempura flour and water, stir to mix and let soak overnight. Soaking the flour for the rice batter overnight is recommended in order to allow it to ferment a little. This is what makes the cake texture soft and fluffy.
The next day, purée cooked rice with salt and coconut milk in a blender until the texture is smooth. Add the soaked flour and pulse a few times to mix well. If you'd like some texture to your cakes stir in a bit of extra steamed rice. Set aside.
Combine the ingredients for the topping in a sauce pan over medium heat and stir to dissolve honey and salt.
photo credit: D. Harrison
Heat a well-seasoned khanom krok griddle on the stove over medium heat. Test that the griddle is hot enough by flicking a bit of water onto the pan. It should instantly sizzle. When the griddle is hot, lightly but thoroughly brush each dimple in the griddle with a little oil. Pour the rice batter directly from the blender canister into each dimple to about ⅔rds full. The batter should sizzle when it hits the hot metal otherwise the cake will not be fluffy.
Swirl the rice batter by rotating the grill with your hands. This will coat the rim of each dimple to form a crispy edge. Then add a dab (about 1-1½ teaspoons) of the topping mixture over top each cake. Cover with a domed lid and cook for a few minutes over medium low heat or until the cakes are firm and crispy brown on the bottom.
When the hotcakes are firm and a little crispy, remove gently with a butter knife or a spoon and transfer to a plate or serving platter. Re-grease the griddle before making the next batch. Stir the batter well each time before making each batch because the batter tends to settle. Repeat the process until all the rice batter is finished. Decorate with finely sliced green onions or chives or cooked match-stick size slices of pumpkin or cooked corn-kernels or cooked taro.
3 tablespoons unsalted butter 2 ears of corn, shucked 2 okra, sliced fine grain sea salt and fresh ground pepper to taste 3 tablespoons fresh basil leaves cut into thin strips 1 cup coconut flakes, toasted 1 cup sliced almonds, toasted one half of a red onion, chopped 2 cups broccoli florets
Melt the butter in a large skillet over medium heat. Add the corn and okra, season with salt and pepper, and stir to coat the corn kernels evenly. Cook for a few minutes, until the corn looses its raw edge, and then transfer to a large serving bowl. Stir in the coconut flakes, almonds, onion, and broccoli florets.
Well, it’s been 30 days. This is the official, first use of the lemons I preserved last month. To be honest, having never had a preserved lemon, I really wasn’t sure what would come of allowing Meyer lemons to soak unrefrigerated, in a salty brine for a month. I think I anticipated something akin to a pickle. Instead what I got was exactly what the name implies: lemons still fresh as the day I preserved them. Certainly, the flesh is quite salty (and as such, often discarded), but if you peel this away and give the skin a quick rinse, you are left with the same brightly flavored rind from the outset. From a historical perspective, I can understand how this might be invaluable to your cooking repertoire if fresh lemons were not available year-round. I also see the value if you are one (such as me) who prefers to obtain your food according to what’s apropos of the seasons.
Now the fun comes with thinking of ways to incorporate lemon rind in my cooking. Risotto seemed a natural fit. In the recipe I present below, the bright flavor of the lemon pairs really nicely with some unusual additions (cinnamon and allspice) to a standard, homemade chicken stock. What may seem like an odd combination of mulled flavors for a rice dish, results in a classic Moor-inspired savoriness. I’ve said it before, but it bears repeating: I highly recommend making a chicken stock from scratch! The fundamental flavor is incomparable to anything you’ll ever pour from a can or reconstitute from a cube. Yes, it involves a bit more of a time commitment, but the tasks are simple, and the payoff is beyond.
In the spirit of full disclosure, a dear, kind friend made the stock for this recipe. I’m still seeking courage to handle meat for undertakings such as these. Although, currently I'm reading a book that just may entice me to get over this hurdle.
Inspired by a blog post from Not So Humble Pie, with the leftover risotto I made arancini. This was accomplished by stuffing a cube of smoked mozzarella into a clump of cold risotto, rolling it into a ball, then dredging it in egg followed by panko bread crumbs, and deep frying to a golden crisp. The full recipe can be found here. Apparently, I seem to have no fear of deep frying. Isn’t that peculiar?!
The 2010 March Daring Cooks challenge was hosted by Eleanor of MelbournefoodGeek and Jess of Jessthebaker. They chose to challenge Daring Cooks to make risotto. The various components of their challenge recipe are based on input from the Australian Masterchef cookbook and the cookbook Moorish by Greg Malouf.
Chicken Stock Makes about 2 quarts
1 large chicken, 2-3 pounds 2 onions, roughly diced 1 medium leek - white part only, roughly diced 2 stalks celery, roughly diced 2 cloves garlic, halved 1 cinnamon stick 1 tsp white peppercorns 2 bay leaves oreganothyme peel of ½ lemon ¼ tsp allspice
Wash the chicken and bones and places in a large stock pot, cover completely with water and bring to a boil. Skim away any scum as it comes to the surface. Add the vegetables and bring back to a boil. Add the rest remaining ingredients and simmer very gently, uncovered for 1½ hours.
Carefully lift out the chicken, set aside. The chicken meat can be removed from the chicken, shredded off and used for other things like soup! Simmer the stock gently for another hour to concentrate the flavor. You will end up with about 2 quarts of stock. Carefully ladle the liquid into a fine sieve, the less the bones and vegetables are disturbed in this process the clearer the stock will be. The stock is now ready for use. Freeze what you don't need for later use.
Preserved Lemon Risotto Serves 4
4 TBS olive oil 1 large shallot, diced 2 cloves garlic, diced 1¾ cups arborio rice 4 TBS white wine 5 cups or more chicken stock, simmering the peel from 1 preserved lemon, rinsed, patted dry and finely diced. 1 TBS parsley leaves, finely chopped 4 TBS unsalted butter,chilled and cut into small cubes 2 ounces Parmesan cheese, freshly grated
Simmer the stock in a large sauce pan. In a dutch oven, heat oil over medium heat. When shimmering, add shallots and sautee for several minutes until lightly golden. Add the rice and stir for a few minutes to coat each grain of rice with oil and toast slightly. Add the wine to the rice mixture, cooking until wine is nearly absorbed.
Add a ladle or two of stock, enough to cover the rice. Cook at a steady simmer, stirring from time to time, until most of the stock has been absorbed. Gradually repeat the process of adding stock, a ladle full at a time, until the rice is creamy and firm. This will take at least 20 minutes depending on your desired level of al dente.
Stir in the preserved lemon. Add an additional ladle full of stock and the butter, and stir until both are completely absorbed. Stir in the Parmesan, cover with a lid and let stand for a few minutes before serving.
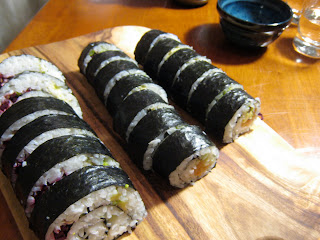
The November 2009 Daring Cooks challenge was hosted by Audax of Audax Artifex and Rose of The Bite Me Kitchen. They chose sushi as the challenge. This challenge required making proper sushi rice to be used to form three types of sushi: a dragon sushi roll – an avocado and sea urchin roe covered inside-out rice roll filled with BBQ eel; a spiral sushi roll – a nori-coated rice roll filled with local veggies from the farmers market that reveals a decorative, spiral pattern when cut; and nigiri sushi – hand-shaped rice balls topped with sashimi-grade yellow tail, ahi or salmon.
Oh, my. A challenge indeed for a flexitarian (that’s me) with squeamish tendencies towards raw meats (or in this case fishes). I usually order my sushi with just veggies. I know, not too exciting. So wanting to step it up for this challenge, I did what any sensible person in my predicament might do, I enlisted help from my friends. How does the saying go? Sometimes it’s not what you know, but rather who you know.
First, a stop to the local fish market, Monahan’s for sashimi-grade fish. Discussing my options (eel, ahi, yellow fin, fluke, salmon) with the fishmonger was actually quite fun. I ended up purchasing a bit of each (minus the fluke) along with a lobe of sea urchin roe. Mmhmm, that’s right, I even splurged on a bit of roe!
Then, a quick pop over to the neighbors to borrow their fancy “fuzzy neuro” rice cooker. Admittedly, the challenge wasn’t written for this option, but I cheated. My friends sing high praises for their rice cookers. You know they can be programmed to make you breakfast? Imagine, oatmeal ready first thing in the morning without dirtying a pot. I’ve never used one. This was just the excuse I was looking for to try it myself.
Finally, an invitation to a friend with superb julienning skills to bring a bottle of good drinking sake, a bamboo rolling mat, and a hearty appetite. Absolute brilliance on my part! I didn’t touch the fish at all. I was in charge of rice. Don’t think I got off too easy, though. Proper sushi rice definitely has its own nuances (mainly all the rinsing) before pressing the cook button on the machine. And of course, there was the fun of filling and rolling the nori and forming the nigiri.
I’m sure you are wondering, so yes, after it was prepared, I did eat the sushi, raw fishes and all. It was actually quite amazing! I think both quality ingredients and the pride that goes into preparing something yourself make all the difference in your perception of a meal. For me, the satisfaction from both these factors plus the gratitude from friendships made this dinner especially meaningful.
SUSHI RICE (makes about 7 cups of cooked sushi rice)
2½ cups uncooked short grain sushi rice 2½ cups water 3 inch square dashi konbu (or kombu) (dried kelp seaweed) wipe with a damp cloth to remove white powder & cut a few slits in the sides of the kelp to help release its flavors 2½ tsp quality drinking sake
Swirl rice gently in a bowl of water, drain, repeat 3-4 times until water is nearly clear. Gently place the rice into the bowl of a rice cooker and add 2½ cups of water and the dashi konbu. Add sake to the rice. Follow the instructions on the rice cooker to activate the cooking process.
Meanwhile, prepare the rice vinegar dressing by combining the rice vinegar, sugar and salt in a small bowl. Heat on low setting and stir until the mixture goes clear and the sugar and salt have dissolved. Set aside at room temperature until the rice is cooked.
When the rice has finished cooking, turn it out into a slightly moistened large shallow flat-bottomed non-metallic (plastic, glass or wood) bowl. (Do not use metallic objects since the vinegar will react with it and produce sour and bitter sushi rice.) Use a moistened spatula to loosen gently the rice and invert the rice pot over the bowl, gently causing the cooked rice to fall into the bowl in one central heap. Do this gently so as not to cause the rice grains to become damaged. Remove the dashi konbu (kelp) from the cooked rice.
Slowly pour the cooled sushi vinegar over the spatula onto the hot rice. Using the spatula gently spread the rice into a thin, even layer using a 45° cutting action to break up any lumps and to separate the rice. Don't stir or mash rice. After the rice is spread out, start turning it over gently, in small portions, using a cutting action, allowing steam to escape, for about a minute. Continue to gently slice, lift and turn the rice occasionally, for 10 minutes or until all the vinegar dressing has been adsorbed and the rice is shiny. Cover with a damp, lint free cloth to prevent the rice from drying out while preparing your fillings and toppings.
INGREDIENTS: 1 sheet 7”x8” of toasted nori half of Japanese cucumber 2 cups of prepared sushi rice Glazed Barbecued Eel (ungai) 1 Avocado Vinegared Water – ½ cup of water combined with a dash of rice vinegar 2 TBS Fish Roe
DIRECTIONS: 1. Cut cucumber into strips ¼ inch x 7” long, then salt, rinse and dry the strips. 2. Broil the eel for about 2-5 minutes until bubbling. Cut into two lengthwise strips. 3. Halve, pit and peel the avocado. Cut the avocado halves into thin even 1/8 inch slices. Fan out the cut avocado into a 7 inch overlapping pattern. 4. Cover bamboo mat with plastic wrap. Place a sheet of nori shiny side down, lengthwise, on the edge the mat. 5. Moisten lightly your hands in the bowl of vinegared water. 6.Place one cup of rice on the nori and gently rake your fingertips across grains to spread rice evenly. Do not mash or squash the rice onto the nori, the rice should appear loosely packed and be evenly distributed over the entire sheet, you should be able to see the nori sheet in a few places. 7. Flip the rice-covered nori over (so the bare nori is now on top) and place on the edge of the mat closest to you. 8. Arrange one of the eel strips across the length of the nori, not quite centred on it but a little closer to you. Place half the cucumber sticks next to the eel. 9. Lift the edge of the mat closest to you with both hands, keeping your fingertips over the fillings, and roll the mat and its contents until the edge of the mat touches straight down on the nori, enclosing the fillings completely. Lift up the edge of the mat you're holding, and continue rolling the inside-out roll away from you until it's sealed. Tug at the mat to tighten the seal. If the rice doesn't quite close the roll add more rice in the gap and re-roll using the mat to completely cover the inside-out roll. Place the roll on a damp, clean smooth surface. 10. Spread about 1 tablespoon of the optional fish roe along the entire top of the rice-covered roll. Using the plastic covered mat gently press the fish roe so it adheres to the rice. 11. Slide a knife under one fan of avocado and transfer it onto the top of an inside-out roll. Gently spread out the avocado layer to cover the entire roll. Lay the plastic wrapped mat over the avocado-covered roll. Squeeze very gently to shape the roll. 12. Lay a sheet of plastic wrap over the roll. Slice the roll into 6-8 equal, bite-sized pieces, wiping your knife with a damp towel before each slice. Discard the plastic wrap. Repeat the above to make one more roll. 13. Arrange the cut pieces on a serving plate with the sauces so the finished dish appears as a dragon breathing fire and flames (or a caterpillar with many legs).
SPIRAL SUSHI ROLL
Yield: One Roll, cut into 8 pieces
INGREDIENTS: 2½ cups prepared sushi rice 2 sheets of toasted nori, each sized 7”x8” Six assorted fillings, each filling should be the size of a pencil
DIRECTIONS: 1. Join 2 sheets of nori by moistening the adjacent edges and overlapping them about ½ inch. 2. Place this double sheet shiny side down on a rolling mat, part of the nori will extend beyond the mat. 3. Using moist fingers place 2½ cups of rice on the nori and gently rake your fingertips across grains to spread rice evenly, leaving ¼ inch nori showing on the both ends of the sheet. Do not mash or squash the rice onto the nori, the rice should appear loosely packed and be evenly distributed over the entire sheet, you should be able to see the nori sheet in a few places. 4. Using your fingers form six grooves (in the same direction that you will be rolling the mat) at even intervals across the bed of rice. Make the first groove about 2 inches from the edge of the nori sheet. Form the grooves by pushing the rice away, do not mash or squash the rice, leave a loose one grain layer of rice in the bottom of the grooves. Level the areas between the grooves where you have pushed the rice. 5. Place your fillings in the grooves. Fill the grooves a little higher than the surrounding rice bed. 6. Then roll the sushi up from the edge closest to you, this will form a spiral pattern of nori, rice and fillings inside the roll. 7. Slice into 8 pieces with a very sharp wet knife, wiping the blade with a damp cloth after each cut. 8. Place the pieces on a platter and garnish.
NIGIRI SUSHI Yield: 14-16 pieces of sushi
INGREDIENTS: 2 cups prepared sushi rice 8 pairs of assorted toppings, 7 ozs total of fish 1 TBS Wasabi to adhere topping to rice
DIRECTIONS: 1. When handling sushi rice, make certain your hands are very clean. To keep the rice from sticking to our hands moisten your hands with vinegared water. 2. Form nigiri sushi by scooping up a small amount (about 2 tablespoons) of rice with your forefinger and second finger of your right hand and placing it in your cupped left palm. 3. Use the fingers and thumb of your right hand to form it into a long, narrow mound (about 2 inches x 1 inch wide) in your cupped palm. 4. Press enough to make the rice hold firmly together. Place the nigiri on a damp cutting board flat side down. Don't let sushi touch or they'll stick to each other. At this point, you can cover the sushi with plastic wrap, and they'll keep at room temperature (not the refrigerator) for several hours. 5. Smear a thin line of wasabi on top of the rice and place the topping piece on it. You may need to press the topping down lightly with your fingers and adjust the shape of the rice accordingly to form an attractive piece of nigiri sushi.
The August Daring Cooks Challenge was hosted by Olga from Las Cosas de Olga and Olga’s Recipes. She chose a dish from José Andrés, a renowned Spanish chef who trained under Ferran Adria at his three Michelin star restaurant El Bulli. José now lives in Washington DC where he owns several restaurants. I’ve been most fortunate to dine at Jaleo, Zaytinya and Oyamel, and at each had a satisfyingly memorable and unique meal.
The paella-like recipe Olga selected is from José’s TV show Made in Spain. Of course, being the cook that I am, I made my own modifications. Namely, I eliminated the cuttlefish. I made paella myway…finally. This was a long time coming. More than several years ago, fresh off the plane on my first trip to Europe, sitting in an outdoor café in Madrid, I ordered paella. Be it youthful naivete or general stupid-Americanism, I tried to customize my order with the waiter in horribly broken Spanish. Really all I wanted was yellow rice, vegetables and beans, with NO fish! (Still working through this: I am squeamish about the fishy things of which traditional paella abounds.) He nodded in what I thought was understanding and promptly brought me the unedited version. Chagrinned and not knowing enough Spanish to protest, I picked around the shells and fishy bits and swallowed politely. Oh well, I was hungry.
For my version, cuttlefish was substituted with potatoes that I purchased from a particularly proud farmer at the market. He gave me his recommendation on (in his opinion) the prettiest, brilliant red-skinned spuds. The gorgeous mushrooms in this dish were grown at Tantré Farms. As another ingredient note, I used Calasparra rice, a short-grain variety that is particularly suited for use in paella due to its capacity to absorb large amounts of broth while remaining firm. It really cooks up beautifully like plump little toothsome sponges brimming with saffron flavor! Unlike risotto, which also uses short-grain rice as a foundation, the preparation of paella requires minimal stirring and fretting. Try making it yourself. It really takes very little effort to prepare.
Ingredients (serves 4):
4 Artichokes (because of the season, I used a canned variety)
12 Mushrooms (button or Portobello)
1 or 2 Bay leaves
1 glass of white wine
4-6 red-skinned potatoes, medium-size dice
Sofregit (see recipe below)
2 cups short grain rice (Calasparra or Montsant are preferred, but you can choose any other short grain.
6 cups vegetable stock
1 pinch of saffron threads, crushed
Allioli (see recipe below)
Add 1 or 2 tablespoon of olive oil in a large pan on medium heat. Add the potatoes and cook stirring occasionally to prevent sticking to pan.
Cut artichoke hearts into eighths. Clean the mushrooms and cut them into fourths. Add a bay leaf, artichokes, and mushrooms to the potatoes and sauté until potatoes are golden. Next pour in enough white wine to deglaze the pan and then add several tablespoons of sofregit, stirring to incorporate.
Add the vegetable stock and bring it to boil. Stir in the rice. Let boil for about 5 minutes on heavy heat. Add saffron and stir once or twice to incorporate. Reduce heat to low and boil for another 8 minutes (or until rice is a little softer than “al dente”). Remove the pan from heat and let the rice stand a couple of minutes before serving with allioli.
Sofregit is a fragrant sauce made of olive oil, tomatoes, garlic and onions, and also sometimes includes different vegetables such as peppers or mushrooms.
Ingredients:
2 Tbs of olive oil
5 big red ripe tomatoes, chopped
2 small onions, chopped
1 green pepper, chopped
5 garlic cloves, chopped
1 Bay leaf
1 tsp fresh oregano, chopped
Salt
Touch of ground cumin
Put all the ingredients together in a large swallow pan and sauté slowly for about an hour until all vegetables are soft. Taste and salt as needed.
Allioli (Traditional recipe)
Ingredients:
4 garlic cloves, peeled
Pinch of salt
Fresh lemon juice (several drops)
Extra-virgin Spanish olive oil
Finely mince the garlic along with the salt using the flat side of your knife to mash into a smooth paste. Add the lemon juice to the garlic and drop by drop slowly pour in the olive oil as you continue to crush the paste with your knife. It takes time—around 20 minutes— and a bit of patience to create a dense, rich sauce the consistency of a very thick mayonnaise.