custom cakes/cookies

Showing posts with label local food. Show all posts

Sunday, November 11, 2012

Green Rooibus-Roasted Butternut Squash Soup

I contribute recipes to the blog of my friends' tea company, Arbor Teas. Here is a recipe that uses one of their teas as a foundation for a soup broth.


If you enjoy drinking non-caffeinated and herbal teas, then surely by now you have experienced African rooibus. And perhaps you’ve even learned how to pronounce it properly too (hint: ROY-bus). But have you tried green rooibus, yet? It’s an unoxidized version of traditional (oxidized) rooibus that tastes lighter, less sweet and more herbal compared to its counterpart. These qualities also make green rooibus infusions a perfect foundation for soup broth. Here I blend green rooibus with roasted butternut squash, garlic, onions and cream for a wonderfully rich and herbal wintertime soup. It whips up without too much trouble and freezes nicely if you’d like to have a meal at the ready as the busy holiday months approach us.

Green Rooibus-Roasted Butternut Squash Soup

serves 4

4 cups water
3 TBS Organic green rooibus tea leaves
2 lb butternut squash, split in half lengthwise and seeds scooped
3 cloves garlic sliced
olive oil
1 medium onion, finely sliced
2 cups heavy cream
salt, fresh ground pepper and fresh ground nutmeg to taste


1. Bring water and organic green rooibus to a boil in a small sauce pan. Simmer for 5 minutes, then top with a lid and remove from heat. Allow rooibus to infuse while you proceed to the next step.
2. Preheat oven to 350° F.
3. Place the halved butternut squash on a roasting pan, sprinkle with the sliced garlic and drizzle with olive oil. Roast until slightly browned and soft, 45 minutes to an hour.
4. Heat a bit of olive oil in a large saucepan and sauté the onion until translucent. Turn off heat and set aside. Reserve saucepan, without wiping clean for the final steps of simmering the soup.
5. Scoop roasted garlic slices and squash from its skin into the canister of a blender. Add the sautéed onions and then strain the rooibus broth into the canister. Blend until completely smooth.
6. Pour the soup back into the saucepan and bring to a simmer, stirring occasionally and scraping up any browned bits left behind from sautéing the onions.
7. Add the cream, salt, pepper, and freshly grated nutmeg to taste. Bring to a simmer again and heat gently for 10 minutes more. Do not allow to boil.

Monday, September 3, 2012

Khanom Krok (grilled coconut rice cakes)

photo credit: D. Harrison

The grilled coconut rice cakes (Khanom Krok) from Marnee Thai were the most memorable thing I ate during my summer vacation in San Francisco. It's a seasonal appetizer (occasionally offered at the restaurant) that is delivered to your table with quite a lot of flair. The cakes arrive still sizzling in the special cast iron griddle in which they were cooked. You watch as the wait-person loosens each cake from the pan and divvies them among your plates. They're fluffy yet glutinous and sweet. I was completely curious (and baffled) about how the texture of the pancakes was achieved, so I asked for the recipe. A day later the chef, Chai Siriyarn, emailed me a word document with complete instructions! He mentioned that Khanom Krok is a favorite street food in Thailand that is normally served for breakfast or as a snack. It's quite sweet, like coconut pudding, and depending on how you decorate with toppings, could also be considered a dessert. I topped mine with a salad made from corn and okra in my farm share and the broccoli growing (and flowering) in my garden.


Khanom Krok (Grilled Coconut Rice Cakes) 

Ingredients

8 oz. rice flour (½ pound)
2 teaspoons tempura flour or all purpose flour
½ cup steamed rice (cooked very soggy until clumped)
1¼ cups coconut milk 
1½ cups water 
½ teaspoons salt
oil for brushing the griddle 


For the topping 

1¼ cups coconut milk 
¼ cup honey (or less depending on your sweetness preference) 
½ teaspoon salt 


Combine rice flour, tempura flour and water, stir to mix and let soak overnight. Soaking the flour for the rice batter overnight is recommended in order to allow it to ferment a little. This is what makes the cake texture  soft and fluffy. 

The next day, purée cooked rice with salt and coconut milk in a blender until the texture is smooth. Add the soaked flour and pulse a few times to mix well. If you'd like some texture to your cakes stir in a bit of extra  steamed rice. Set aside. 

Combine the ingredients for the topping in a sauce pan over medium heat and stir to dissolve honey and salt.


photo credit: D. Harrison
Heat a well-seasoned khanom krok griddle on the stove over medium heat. Test that the griddle is hot enough by flicking a bit of water onto the pan. It should instantly sizzle. When the griddle is hot, lightly but thoroughly brush each dimple in the griddle with a little oil. Pour the rice batter directly from the blender canister into each dimple to about ⅔rds full. The batter should sizzle when it hits the hot metal otherwise the cake will not be fluffy. Swirl the rice batter by rotating the grill with your hands. This will coat the rim of each dimple to form a crispy edge. Then add a dab (about 1-1½ teaspoons) of the topping mixture over top each cake. Cover with a domed lid and cook for a few minutes over medium low heat or until the cakes are firm and crispy brown on the bottom. When the hotcakes are firm and a little crispy, remove gently with a butter knife or a spoon and transfer to a plate or serving platter. 

Re-grease the griddle before making the next batch. Stir the batter well each time before making each batch because the batter tends to settle. Repeat the process until all the rice batter is finished. Decorate with finely sliced green onions or chives or cooked match-stick size slices of pumpkin or cooked corn-kernels or cooked taro. 


Coconut Corn and Broccoli Salad 

adapted from 101cookbooks 


3 tablespoons unsalted butter 
2 ears of corn, shucked 
2 okra, sliced 
fine grain sea salt and fresh ground pepper to taste 
3 tablespoons fresh basil leaves cut into thin strips 
1 cup coconut flakes, toasted 
1 cup sliced almonds, toasted 
one half of a red onion, chopped 
2 cups broccoli florets 


Melt the butter in a large skillet over medium heat. Add the corn and okra, season with salt and pepper, and stir to coat the corn kernels evenly. Cook for a few minutes, until the corn looses its raw edge, and then transfer to a large serving bowl. Stir in the coconut flakes, almonds, onion, and broccoli florets.

Monday, March 5, 2012

Matcha Ravioli filled with Spring Pea Garlic Scape Pesto and Italian White Bean Purée

I contribute recipes to the blog of my friends' tea company, Arbor Teas. Here is another recipe I created using their matcha tea.

Matcha Tea, made from stone-ground, Japanese green tea leaves, has a body and flavor that is thick and rich and green with a slight bitterness. It’s thought to be even healthier than regular green tea, because the entire tea leaf is consumed, instead of just the infusion as with normal teas. And since it is a powder, it can be incorporated into just about any cooking recipe, swapped out for a little flour. Its deep green hue and flavor add a lot of appeal to homemade pasta.

Inspired by the green of the coming spring, I used Arbor Teas cooking grade organic matcha green tea to make matcha ravioli. I filled the pasta with a green pea and Italian white bean purée, and topped it with a garlic scape-kale pesto. So very green!

A more simple filling idea would be to use an herb-laced ricotta. After reading this post by Smitten Kitchen, I’ve taken to making my own. It’s really very simple to do.

Even simpler, cut the fresh matcha pasta into thin linguini strands, cook in boiling water, and top with your favorite sauce.


Matcha Pasta
(serves 3-4)

9½ ounces (scant 2 cups) all purpose flour
1 heaping tablespoon organic Matcha Green Tea
3 large eggs, beaten

Add the flour to the workbowl of a food processor and pulse a few times to evenly distribute. Add the eggs. Process again for about 30 seconds until the dough forms a rough ball. It’s OK if some small bits remain unincorporated. Turn the contents of the workbowl onto a floured surface and knead until the dough is smooth, 1 to 2 minutes. Cover with plastic wrap and set aside for at least 15 minutes and up to 2 hours, allowing the dough to relax.

Dough that has the perfect amount of moisture will come together in one large mass. If the dough resembles small pebbles it is too dry; with the motor running, add water ½ teaspoon at a time until the dough forms a rough ball. If the dough sticks to the side of the workbowl it is too wet; add flour, 1 tablespoon at a time, and process until the dough is no longer tacky and forms a rough ball.

Using a manual pasta machine or a rolling pin, roll out the dough into thin, satiny sheets. It should be rolled thin enough that you are able to see the outline of your hand through the pasta. Lay the sheet of pasta on a clean kitchen towel and cover it with a damp cloth to keep it from drying out. Repeat with the other pieces of dough. Leave the pasta as is for use in filled pastas or cut the pasta sheets into long strands to make fettuccine.

If making ravioli, place a dollop of the filling (recipe below) along the rolled sheet every few inches. Lay another sheet of dough directly over the filling and press down to seal the ravioli. Cut into squares with a pastry wheel. Place the cut ravioli on a floured baking tray and repeat with the remaining dough and filling.

If you don’t plan to cook the ravioli right away, place the baking tray full of finished ravioli (in one layer only) in the freezer. Once the ravioli have frozen solid (half an hour or so), you can transfer them into a zip-top plastic bag and continue to freeze until ready to use. When ready to serve, drop the frozen ravioli directly into a large pot of salted boiling water for 4 or 5 minutes. Carefully remove cooked ravioli with a slotted spoon and then toss with sauce.


Filling: Spring Pea, Garlic Scape, Italian White Bean Purée

¾ cup garlic scapes, diced
1 cup shelled peas
1 tablespoon butter
¼ cup olive oil
1 tablespoon lemon juice
1 teaspoon salt
¼ teaspoon ground pepper
2 cups cooked white beans, drained


Lightly sauté the garlic scapes and peas in butter until softened. Transfer to the bowl of food processor. Blend the scapes, peas, olive oil, lemon juice, salt and pepper until fairly smooth. Add the cooked beans and blend again. Taste and adjust seasonings as needed. Let cool before filling the ravioli.


Garlic Scape-Kale Pesto Sauce
Makes about 1½ cups of pesto
From 365daysofkale.com

1 cup garlic scapes, chopped
3-5 leaves kale, stems removed
⅓ cup pecans, toasted
¾ cup olive oil
½ teaspoon salt
Black pepper to taste

Process scapes, kale, and nuts in the bowl of a food processor until well combined and somewhat smooth but not completely pureed. Slowly drizzle in oil and process again until incorporated. Add salt and pepper to taste.

Thursday, February 23, 2012

Honeybush Tea Jelly

I sometimes contribute recipes to the blog of my friends' tea company, Arbor Teas. Recently, they were featured in the February edition of MetroParent Magazine. (Click through to see a picture of Jeremy, Aubrey, Arthur and Penelope.) Here is a kid-friendly recipe I created using one of their teas.

This one’s for the kids!

One of my favorite naturally non-caffeinated Arbor Teas is their organic Honeybush. Steeping the leaves, stems, and flowers of this plant indigenous to South Africa yields a sweet, light and woody infusion. It is enjoyable both hot and iced, and makes quite a pleasant transition beverage when you are ready to stop drinking caffeine for the day. Here honeybush is used to flavor a jelly. Its woody sweetness balances the tartness of the homemade apple pectin used to thicken the jelly. Really any loose leaf tea could be substituted in this recipe, but I chose honeybush for the kids! Honeybush tea jelly makes fantastic PB&J sandwiches. I’ve also combined the jelly with nuts and spices and stuffed the mixture into apple dumplings. Its sweet tart flavor is fairly versatile and broadly appealing to all sorts.


Honeybush Tea Jelly


6 tablespoons loose tea leaves
2¼ cups boiling water
3 cups green apple pectin stock (see recipe below)
¼ cups fresh lemon juice
3¼ cups sugar

Steep the tea leaves in the boiling water for 5 minutes, then pour through a fine-mesh sieve into a 6-8 quart pan. Add the pectin stock, lemon juice, and sugar to the pan. Bring to a boil over high heat and cook for 25-30 minutes, stirring occasionally to prevent scorching, until the jelly registers 220 °F on a candy thermometer.

Ladle the jelly into sterilized canning jars and process for storage using whichever method you prefer best.


Green Apple Pectin Stock

3 pounds green apples (I used early transparent, one of the first apple varieties available at my farmer’s market in early fall. More readily, commercially available Granny Smith will work as well.)

Cut the apples into 8 sections. Discard the stems only. Peels, core, seeds and remaining fruit all contain valuable pectin. Place the apple sections in a 6-8 quart pan. Add 6 cups of water. Cover the pan and bring to a boil over high heat. Boil until the apples have broken down and the peels separate from the pulp. This should take 30-40 minutes. Stir occasionally to prevent apples at the bottom of the pot from scorching.

Set a large mesh sieve over a deep bowl. Pour the cooked apples and juice into the sieve and let drain for at least half an hour, until you have about 5½ cups juice. Stir occasionally, to dislodge the pulp at the bottom of the sieve and allow proper draining, but do not press down too hard so as to push the pulp through the sieve.

Once strained, the pulp can be passed though a food mill to remove seeds and skins. This yields a very tart applesauce that can be eaten straight out of hand (sweetened and spiced at will) or incorporated into another recipe.

Bring the 5½ cups juice to a boil over high heat and cook until reduced to about 3 cups. This should take about 20 minutes. Refrigerate pectin stock, up to 2 weeks, until ready to use, or freeze for several months.

Holiday Spice Black Tea Red Pepper Relish

I sometimes contribute recipes to the blog of my friends' tea company, Arbor Teas. Here is a recipe I created over the winter holiday using one of their special seasonal teas.

Over the final few weeks of my CSA share last year, I built quite a collection of red peppers. Both hot varieties (Krimzon Lee, Serrano, Jalapeno, Shishito) and sweet bells (Apple Pimento, Carmen, Red Knight Bell) were filling up the crisper until enough accumulated to make this relish. Sweet with piquant heat and spiced just so with orange, cinnamon, and clove using Arbor Teas Organic Holiday Spice Black Tea, this ruby-toned relish makes a useful condiment to have on hand to dress up holiday meals or to gift away to friends this season. Use it to top cheese and crackers for a quick snack, mix with ketchup for a fancy chili dipping sauce, or dollop over your take-out ramen bowl to add a festive touch.


Holiday-Spice Red Pepper Relish
Makes 1½ pints

About 2 ½ pounds mixed types of red peppers (sweet and/or hot varieties)
1 tablespoon kosher salt
2 cups white vinegar
3 tablespoons Organic Holiday Spice Black Tea
3 cups sugar


Directions:

Pulse red peppers in a food processor to finely chop. This should yield about 4 cups. Combine chopped peppers and salt in a large bowl. Set aside for 2 to 3 hours, until a considerable amount of liquid is drawn out of the peppers. Meanwhile combine the vinegar and the tea in a separate bowl and set aside at room temperature to steep for the duration of salting the peppers.

Place the peppers in a sieve to strain, pressing with the back of a spatula to squeeze out as much liquid as possible. Transfer the peppers to a wide, 6-quart, heavy-bottomed pan and add the sugar. Place the sieve over the pan (to catch the loose tea) and pour in the steeped vinegar. Bring to a boil over high heat, stirring frequently. Cook until the pepper is translucent and the syrup is somewhat thick. Jelly-like consistency is achieved at 220° F. This may take 25-35 minutes of stirring. Temperatures higher than 220° F will yield a more resinous-like relish that will be difficult to spread, so be attentive to the thermometer throughout the boiling.

Ladle hot relish into clean jars and process for canning or store in the refrigerator for use within the next few months.

Friday, January 21, 2011

Cultured Tea Butter and Buttermilk

I often contribute recipes to the blog of my friends' tea company, Arbor Teas. Here is the latest recipe I developed using a few of their teas.

2010 seemed to be the year of DIY in the food world, and I have no doubt that 2011 will continue to be the same. If the reasons are not for putting up (canning, curing, dehydrating, etc.) to preserve the abundance of harvest for leaner times like our great grandparents used to or not meant to ease reliance on commercially-packaged, convenience foods, then it's to satiate the curiosity of how basic foodstuffs are produced and to relish in the pure satisfaction that you can DO IT YOURSELF.

Remember taking turns to shake that jar of cream in kindergarten until it thickened and yielded a soft, spreadable butter? Patience-inducing yet awe-inspiring to a 5-year old. Making cultured butter from scratch is just one step up from that sort of classroom demo magic. And using a modern stand mixer makes it an easily approachable task if your kitchen amenities are sans old-fashioned butter churn and butter bats. Furthermore, fresh, liquid cream presents a blank canvas on which you can layer a custom flavor profile at the very foundation, before churning. You can add cultures for tangy-ness as well as ingredients, like tea, that steep best in liquid without altering the final texture. Compound butters, a different approach to flavored butter where herbs, aromatics, syrups or fruit pastes are mashed into solid butter, while good in there own right, offer only the opportunity for flavor afterthoughts, post-churning.

So in the spirit of DIY, I present you below with directions for culturing butter and flavoring it using Arbor Teas' oraganic, loose-leaf tea. Cultured tea butter should not be confused with Tibetan butter tea, a yak milk-derived, fortifying hot beverage for the iron-stomached. This is a wholly different dining experience. I chose two very different Arbor Teas to make two unique flavors. The first was organic genmaicha green tea, which is composed of Japanese green tea leaves mixed with toasted brown rice kernels. This tea flavor brings to mind popcorn, and thus lightly salted butter flavored with genmaicha lends itself to savory applications: smeared on crusty bread or slathered on roasted vegetables. The second was organic masala chai tea. Redolent with warm spice and delicately sweetened (post-churn) with honey, this makes a welcome addition to a breakfast table spread or to afternoon tea fare.

As a premium for churning your own butter, you will also produce a good amount of deliciously drinkable, tea-flavored buttermilk. I used the excess to make the tiny corn biscuits pictured above. They were a perfect vehicle to deliver taste tests of homemade tea butter (either sweet or savory) to friends. A note of caution, though, before proceeding: you may start consuming more butter than you ever thought necessary. It's that good!

Cultured Tea Butter and Buttermilk
makes about a ½-pound of butter and about 1 cup buttermilk

2 TBS organic loose tea leaves
2 cups heavy cream (the best quality you can find: highest butterfat, least pasteurized)
2 heaping TBS plain whole-milk yogurt, crème fraîche or buttermilk (be sure these do not contain any additive gums or stabilizers)

ice

⅛ - ¼ tsp flaky sea salt
1 TBS (or more to taste) honey (optional)

Make a tea sachet by packing the loose tea leaves in a tea sac or other type of disposable filter and tying securely with kitchen twine. Place the tea sachet in a clean glass mason jar. Pour the heavy cream and yogurt over the tea. Stir to combine. Cover loosely and place it in a warmish part of the house - the ideal temperature is around 75° F, but anywhere in the range from 70-80° F will work.

After 12-18 hours, the cream should be noticeably thicker and should taste slightly tangy. If it hasn't thickened yet, leave it alone for another few hours and eventually it will. When your cream has thickened, remove the tea sachet and scrape off any thickened cream that may adhere to the filter, adding this back to the cream. If you are not ready to make your butter right away, transfer the container to the fridge where you can leave it for up to another 24 hours.

When ready to churn the cream, remove it from the fridge and allow it to stand at room temperature until it reaches about 60° F. If you're making it from room temperature you'll need to place the bowl in a bath of ice water for a few minutes to cool it down.

Fill another large bowl with water and ice cubes and set this aside.

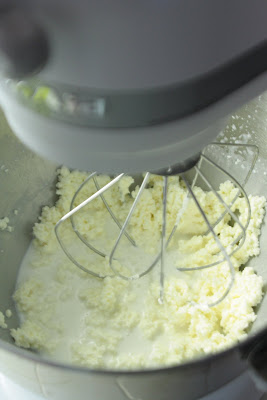
Pour the cream into the bowl of a stand mixer and beat at high speed using the whisk attachment. A hand-held electric beater or even whisking vigorously by hand will also work. When the cream starts to form stiff peaks (see picture below at left), reduce the speed to low. Watch carefully, first the peaks will start to look grainy, and a few seconds later the cream will break. When it does, clumps of pale yellow butterfat will form leaving a pool of buttermilk in the bowl (see picture below at right). Stop beating. Carefully strain the bowl over a cup to drain away as much buttermilk as possible. Reserve the buttermilk for another use.


Next the butter must be washed with ice water to remove any residual buttermilk, which could cause the butter to spoil prematurely. If using a stand mixer, switch the whisk attachment for the dough hook. If you don't have a stand mixer, a fork or a stiff rubber spatula will do. Pour some of the reserved ice water over the butter, kneading it vigorously. The water will turn cloudy and the butter will seize up, making it cohere and knead more easily (see before and after pictures below). Pour out the liquid and repeat as many times as needed (about 3-4 times) until the rinse water in the bowl is completely clear. After the last of the rinse water has been poured off, continue kneading for a few more minutes to get as much water as possible out of the butter. Pour off any residual liquid. Add the salt (and honey, if using) now and continue to knead until completely incorporated.


Pack the cultured tea butter into ramekins or shallow jelly jars, roll it in parchment paper, or use it to fill shaped molds before covering tightly and refrigerating. Place in the freezer for longer term storage.

Monday, January 17, 2011

Using up the Last of the T-giving Turkey in a Faux Cassoulet

Well, almost two months later, I finally did it. I finished my turkey leftovers from Thanksgiving. Yes, that took awhile! I had proudly cooked a large (15.7-pound) bird for a small group. Guests were sent home with leftovers and a stock was made and some was repurposed into meals the days following the big dinner and still plenty was left to freeze! Now that it's gone, it's safe to assume that I'm not gonna want to eat turkey again anytime soon. Not gonna want to eat any meat for awhile, actually. I'm ready for a post-holiday cleanse...


And when I finish the last of the multitude of winter squash and potatoes still left from my CSA, I'll probably want a cleanse from orange or starchy vegetables, too...


Just as I was deciding this, the Daring Kitchen challenged me to make a confit to use for a classic preparation of a traditional French cassoulet. Do you know what that means? Typically confit refers to meat that is seasoned and slowly cooked submerged in its own rendered fat. An interesting food preservation technique that I do want to learn, but, um, not very cleansing.

I took the veg option, which meant cooking vegetables with a good glug of olive oil before adding in the stock and other various ingredients to make it a stew of sorts. And then I deleted its vegetarian label by stirring in the last of the shredded turkey. The finishing accent was a crumble of garlicky toasted breadcrumbs. It's a fine cold-weather soup and a practical solution for turkey excess. Maybe after a few months of virtuous eating have passed, I'll be ready to approach the confit...

Turkey and Veg Cassoulet
adapted from Vegetarian Cassoulet by Gourmet Magazine, March 2008
serves 10-12


Ingredients:
3 medium leeks (white and pale green parts only)
¾ lbs carrots, halved lengthwise and roughly diced
1½ lb butternut squash, peeled, seeded and roughly diced
4 garlic cloves, chopped
¼ cup olive oil
4 thyme sprigs
2 oregano sprigs
1 bay leaf
⅛ tsp ground cloves
½ tsp salt
½ tsp fresh group pepper
4 cups cooked snow cap beans, reserve about a half cup to mash to thicken the soup, reserve the pot liquor (cooking liquid)
28-oz can fire-roasted tomatoes, roughly chopped, reserve juices
about 2 cups shredded, cooked turkey
1 qt turkey stock
1 bunch kale, center ribs removed and roughly chopped

Bread Crumb Topping
4 cups coarse fresh bread crumbs from a baguette
⅓ cup olive oil
1 tablespoon chopped garlic
1 TBS chopped parsley
¼ tsp salt
¼ tsp freshly ground pepper

Directions:
1. Halve leeks lengthwise and cut crosswise into ½-inch pieces, then wash well by swirling in a deep bowl of cold water. Allow the dirt to fall to the bottom of the bowl. Skim off clean leeks from the water surface being careful not to disturb the silt that collected at the bottom of the bowl.
2. Cook leeks, carrots, butternut squash, and garlic in oil with herb sprigs, bay leaf, cloves, salt and pepper in a large heavy pot over medium heat, stirring occasionally, until softened, about 15 minutes. Stir in beans (both whole and mashed) and its pot liquor, tomatoes and their juices, shredded turkey and stock. Stir in the kale. Simmer, partially covered, stirring occasionally, until kale is wilted and carrots are tender but not falling apart, about 30 minutes.
3. Preheat oven to 350°F with rack in middle.
4. Toss bread crumbs with oil, garlic, parsley, salt and pepper in a bowl until well coated.
5. Spread in a baking pan and toast in oven, stirring once halfway through, until crisp and golden, 12 to 15 minutes.
6. Cool crumbs in pan.
7. Discard herb sprigs and bay leaf.
8. Season with salt and pepper. Just before serving, sprinkle with garlic crumbs.


Our January 2011 Challenge comes from Jenni of The Gingered Whisk and Lisa from Parsley, Sage, Desserts and Line Drives. They have challenged the Daring Cooks to learn how to make a confit and use it within the traditional French dish of Cassoulet. They have chosen a traditional recipe from Anthony Bourdain and Michael Ruhlman.

Wednesday, December 15, 2010

Oeufs en Meurette

I've been neglecting my usual posting schedule these past couple of months for good reason: I bought a house. It was a huge decision that caused me a lot of anxiety as my friends, family and realtor can attest. But now that I'm (mostly) unpacked, I feel very much at home. My house is cozy and full of character and enjoys hosting friends around my teeny dining table, or by the wood-burning stove, or even in the sometimes band practice area designated in the basement. When the time is right, I'd like to turn the back yard into a permaculture oasis complete with compost and edible garden and keep chickens and bees...

In the meantime, I've been welcoming friends over to warm my new space. Last weekend, I served oeufs en meurette for brunch. Eggs poached in red wine may seem like an intimidating, high stress choice to make for company...but I had a trick up my sleeve: eggs can be poached in advance, held in chilled water, then slipped back into heated water to gently rewarm just before serving. In fact, this recipe requires that advanced prep because the wine that is the poaching liquid becomes a velvety-rich reduction sauce (meurette) to complete the dish. I could crack eggs and troubleshoot mishaps without an audience. Also, I could use technical "crutches" without judgment. It was not easy to gauge the cooking progress of eggs dropped into an opaque liquid, so I used a thermometer to ensure an appropriate simmer was maintained and a timer to keep me from getting distracted by other prepping tasks of peeling onions, slicing mushrooms, and chopping bacon for the accompaniments.

This is a good snowy weather dish. Here's the recipe if you'd like to try it as well:


Oeufs en Meurette
Serves 8

8 eggs
1 bottle, full-bodied red wine (I used a Tempranillo)
2 cups chicken stock
1 onion, quartered
1 carrot, cut into three pieces
1 celery stalk, cut into three pieces
1 clove garlic, crushed
Bouquet garni (thyme, parsley, bay leaf)
½ tsp black peppercorns
2 TBS butter
¼ lb mushrooms, sliced
¼ lb bacon, diced
16 pearl onions, peeled
Vegetable oil for frying
8 slices of baguette, ¼-in thick
2 TBS butter, room temp
2 TBS flour
salt and pepper


1. Bring wine and stock to a boil in a large pan and then lower heat to maintain a strong simmer around 190°F. Poach eggs a couple at a time for 3-4 min. Yolks should be firming but still a little soft. Set them aside in a bowl of ice water.

2. Add the vegetables, herbs, and peppercorns to the poaching liquid and let the sauce simmer until reduced to half volume. This will become the meurette sauce.

3. In a separate large skillet, melt 1 TBS of the butter on medium-high heat and sauté the mushrooms until soft and then set aside. Add in another 1 TBS butter and the bacon, frying until browned, then set aside on a paper towel. Turn down the heat to medium, add in the pearl onions and sauté until softened and browned. Then drain off the fat and add the bacon and mushrooms back to the pan and set aside off the heat for the moment.

4. In a medium skillet, heat a few tablespoons of oil and then fry the baguette slices until browned on each side. Add more oil as needed. Set the fried bread (croûtes) on a paper towel and then place on a baking sheet in an oven that is set to whatever your lowest setting is to keep them warm.

5. Blend 2 TBS butter and flour together to form a paste of sorts that will be used as the thickener for the sauce. Whisk this into the reduction sauce until the sauce starts to thicken. Strain the sauce over the skillet of mushrooms, bacon and onions, and return the skillet to heat, bringing to a boil. Season with salt & pepper to taste, then set aside again.

6. Reheat the eggs by placing them in hot water for a quick minute. To serve, plate a poached egg on top of a croûte, and then ladle some of the mushrooms/bacon/onions and sauce on top.


Jenn and Jill have challenged The Daring Cooks to learn to perfect the technique of poaching an egg. They chose Eggs Benedict recipe from Alton Brown, Oeufs en Meurette from Cooking with Wine by Anne Willan, and Homemade Sundried Tomato & Pine Nut Seitan Sausages (poached) courtesy of Trudy of Veggie num num.

Thursday, September 30, 2010

Amy Atlas Wannabe


Last week my friend Jo got married. The wedding venue was a spectacular farm, complete with gorgeous barns, rolling hills, and a peaceful lake. Jo hired a super talented florist and one of the best local caterers in town. Heather (Sweet Heather Anne) and I were lucky enough to be asked to do an Amy Atlas-esque dessert table for the reception. Jo was such a laid back bride and gave everyone a lot of creative freedom to work within her vision. Her theme was a series of playful vignettes, packed with the charm and vintage worthy of a photo spread in Once Wed. Here's a peek at her penny candy table. See what I mean? Adorable!


And this is how the dessert table turned out. To pull the look together, Heather and I used various cake stands, jadeite platters, metal canisters, and a lovely floral tablecloth from Jo's collection of vintage treasures.


Heather made the cakes, three total and each a different flavor; I made the pastries; and together, we made 8 dozen painted sugar cookies!


The cake design was inspired by Jo's wedding attire, a striking teal mermaid gown with ruching from bodice to floor and a peacock feather hair piece.


The cake flavors were a ginger sour cream cake layered with apricot-ginger jam and topped with a vanilla buttercream, a caramel cake with praline crunch buttercream, and a rich chocolate cake with mexican-spiced chocolate ganache.


In addition to cake and cookies, beautifully rustic apple and raspberry pies made by Helen and Blake of EAT catering also had prominence on the table.


The pastries included chocolate dulce de leche bars, mexican wedding cookies, and brown butter spoon cookies sandwiched with either my homemade raspberry or apricot jams.


A small detail of which I'm most proud for the display is the signage. I was stumped by how to prop up the labels and disenchanted with the numerous cheesy place card holders available for purchase.


Then DIY inspiration hit. When looking through Jo's vintage tableware collection, I saw these: rusty mattress springs with alligator clips welded to the tips meant to be used to display the table numbers.


I made a miniature version by twisting 18-gauge copper wire into the necessary shape. Then, to eliminate the shiny, new-penny look, soaked the wires in a "tarnishing" solution borrowed from a jewelry-making friend to give the perfect brown/black patina.


Making this table (every step from concept to execution) was so much fun! A perfect use of my interests and talents. It would be a dream to quit my day job and instead do this full time. Watch out Amy Atlas, one day I may just get the courage to take the leap...

Friday, August 27, 2010

Baked Alaska from the Soul of the Earth


Toasted marshmallow. Fresh peaches. Honey. A butter-rich cake that hints at caramel due to a heap of brown butter. These are the flavors of my first Baked Alaska. It's preparation wasn't the disaster (i.e., torching ice cream) I always assumed it would be. But maybe my kitchen confidence has improved a bit since the first time I heard what's involved in making a Baked Alaska.

Having no disastrous stories with which to regale you, let's move topics to the world news. Did you hear the price of wheat is rising? Bad news for the state of our global climate and for everyone not abstaining from gluten. But good impetus if, like me, you want to explore alternative grains in their whole form. After reading Good to the Grain cover to cover, I'm ready to nearly wholly commit back to this way of baking. Though, it's not purely from a health or economic perspective. Really, it's driven by wanting to learn new flavors and new textures. Spelt and buckwheat have been my mainstays when I wander past the bin of all-purpose. I'm ready to push the boundaries a little further.

So in that vein...

Today's new-to-me flour is brought to you by the whole grain: kamut [pronounced ka MOOT]. When ground to a fine powder to be used as flour, the amber-colored grain has a buttery flavor and lends a crumbly, sandy texture. This makes it well-suited for baked goods and an especially perfect complement to those rich in butter. Compared to standard wheat, kamut is higher in protein, lipids, selenium, zinc and magnesium, making it a high energy food source that is rich in antioxidants.

Kamut's ancestry can be traced as far back as the wild grains that grew in the Fertile Crescent of Mesopotamia and are claimed to have traveled on Noah's ark. According to legend, 36 kernels of khorasan wheat found in an Egyptian tomb made their way into the capable hands of an organic farmer in Montana. He named the seeds "Kamut" after the ancient Egyptian name for wheat, a word that also meant "soul of the earth". The name was trademarked and an organization was founded to promote research and production worldwide. Still to this day, the organization has protected kamut from being altered by modern plant-breeding practices. Any wheat sold under the name Kamut is guaranteed to be produced organically, free of GMOs. To me, that fact alone is a beautiful reason to incorporate kamut into your baking repertoire.

The cake recipe I'm sharing here is a simple way to showcase its flavor. Using browned butter goes even further to intensify the richness. Read the recipe at least once through before starting to mix the ingredients. The order of additions is quite unique compared to standard pound cake recipes. Also, care should be taken to disturb the batter as little as possible when mixing.

To complete the dessert, I'm sharing my favorite method to make meringue. I learned the technique from Martha Stewart. Like the pound cake, it too is less conventional in preparation as the egg whites are heated over a pan of simmering water just long enough to coax the sugar to melt. Standard meringue recipes skip this step, and as a result, at least to my palate, have a metallic taste. This method produces something more akin to the texture of a marshmallow without the stiffness from added gelatin.

The August 2010 Daring Bakers’ challenge was hosted by Elissa of 17 and Baking. For the first time, The Daring Bakers partnered with Sugar High Fridays for a co-event and Elissa was the gracious hostess of both. Using the theme of beurre noisette, or browned butter, Elissa chose to challenge Daring Bakers to make a pound cake to be used in either a Baked Alaska or in Ice Cream Petit Fours. The sources for Elissa’s challenge were Gourmet magazine and David Lebovitz’s “The Perfect Scoop”. Though both are excellent resources, I didn't use either for the following recipes.


Honey-Peach Ice Cream
from ezrapoundcake.com
who adapted from Dorie Greenspan’s “Baking: From My Home to Yours”


Makes about 1 quart

2 pounds ripe peaches, peeled and pitted
1/4 cup honey
1 cup whole milk
1 cup heavy cream
3 large egg yolks
1/2 cup sugar
2 tsp vanilla extract

Coarsely chop half the peaches into 1/2-inch chunks, and combine with the honey in a small saucepan. Bring to a boil, then lower the heat, cover and cook, stirring occasionally, until the peaches are soft, about 10 minutes. Puree the mixture using a blender, food processor or immersion blender. Set aside.

In a medium saucepan, bring the milk and cream to a boil.

Meanwhile, in a medium bowl, whisk the yolks and sugar together. While whisking, slowly pour in about one third of the milk-cream mixture – this will temper the eggs so they won’t curdle. Pour the custard back into the pan, whisking continuously. Cook over medium heat, stirring without stopping, until the custard thickens slightly and coats the back of a spoon. The custard should reach at least 170° F, but no more than 180° F.

Remove the pan from the heat and stir in the vanilla and peach puree. Refrigerate the custard until chilled (preferably overnight).

When sufficiently chilled, scrape the custard into the bowl of an ice cream maker, and churn according to manufacturer’s directions. While the ice cream is churning, finely dice the remaining 2 peaches, then, just before the ice cream is thickened and ready, add the peaches and churn to blend. Pack the ice cream into a container and freeze for at least 2 hours, until it is firm enough to scoop.

Brown Butter Kamut Pound Cake
adapted from Alice Medrich’s Pure Dessert

16 TBS unsalted butter
3 TBS whole milk, at room temp
3 large eggs, at room temp
1 1/2 tsp vanilla extract
1 cup cake flour (sift before measuring)
1/3 cup plus 1 TBS whole-grain kamut flour
3/4 cup sugar
3/4 tsp baking powder
1/4 tsp salt

Position a rack in the lower 1/3 of the oven and preheat to 350°F. Line a 8 x 4-in loaf pan with parchment.

Place the butter in a large skillet over medium heat. Brown the butter until the milk solids are a dark toasty brown and the butter smells nutty. Pour into a shallow bowl and chill in the freezer until just congealed but still soft, 15-30 minutes.

In a medium bowl, combine the milk, eggs, and vanilla by whisking together.

Mix together and then sift the flours, sugar, baking powder, and salt into the bowl of a standing mixer. In tablespoon portions, scoop 13 TBS of brown butter into the mixing bowl as well. To this add half of the egg mixture. Beat on low speed just until the dry ingredients are moistened. Increase the speed to medium and beat for just 1 minute longer. Scrape down the sides of the bowl and add half of the remaining egg mixture. Beat for 20 seconds. Scrape the sides of the bowl again and add the final remaining portion of the egg mixture. Beat for 20 seconds.

Scrape the batter into the prepared loaf pan. Smooth the surface before transferring to the oven. Bake about 55-65 minutes, until golden brown and when a toothpick inserted into the center comes out clean. If excess browning occurs, tent the pan loosely with foil, after the first 30 minutes into baking.

Cool in the pan 10 minutes. Use the parchment overhang to transfer right-side-up onto a cooling rack. Allow to cool completely.

Meringue

4 egg whites
1 cups plus 2 TBS sugar
1/2 teaspoon pure vanilla extract
1/4 teaspoon cream of tartar
salt

Just before serving, combine whites and sugar in a mixer bowl. Set over a saucepan of simmering water. Whisk until sugar dissolves and mixture is warm, about 3 minutes. Transfer bowl to a mixer, and add vanilla, cream of tartar, and a pinch of salt. Whisk on medium-high speed until shiny, stiff peaks form, about 7 minutes.


Assembly Instructions

Line a bowl with plastic wrap, so that plastic wrap covers all the sides and hangs over the edge. Fill to the top with ice cream. Cover the top with the overhanging plastic wrap and freeze for several hours, or until solid.

Level the top of the brown butter pound cake with a serrated knife. Cut out a circle of cake equal to the diameter of the rim of the bowl. Eat the scraps as a reward for your labor.

Make the meringue.

Unmold the ice cream and invert on top of a cake round. Trim any excess cake if necessary.

Pipe the meringue over the ice cream and cake, or smooth it over with a spatula, so that none of the ice cream or cake is exposed. Freeze for one hour or up to a day.

Toast the tips of the meringue with a culinary torch. Or, bake the meringue-topped Baked Alaska on a rimmed baking sheet under a broiler until lightly golden.

Serve immediately.

Friday, August 13, 2010

Local Ingredients meet Culture Fusion

The August 2010 Daring Cooks’ Challenge was hosted by LizG of Bits n’ Bites and Anula of Anula’s Kitchen. They chose to challenge Daring Cooks to make pierogi from scratch and an optional challenge to provide one filling that best represents their locale.

My choice for representing my locale: kimchi.

Nope, I don't live in Korea. There just so happens to be a new food vendor at my farmer's market, and I've taken it upon myself to get acquainted. For those of you who don't know, kimchi is an ancient Korean food made of various salted, lacto fermented vegetables (the bulk of which usually includes cabbage), hot peppers, and fish oil. It's a natural superfood that's high in dietary fiber, low in calories, rich in vitamins and minerals, and is full of probiotics. Because of its wonderful digestive properties, Koreans use it as sort of a palate cleanser during just about every meal. Due to it's distinctive flavor, Americans typically use it as a condiment. So much better on a hot dog instead of ketchup!

Since kimchi is mostly cabbage, it doesn't seem a far stretch to swap it into any recipe where cabbage or perhaps sauerkraut usually is involved. That's why kimchi on a hot dog is a good idea. That's also why it ended up as the filling in my pierogi. Pierogies often are filled with potatoes and cabbage. There seems to be a very fine line dividing the definition of a pierogi and a dumpling. It may have a lot to do with the filling ingredients (which reflects regional/cultural differences) and also a bit to do with the preparation. Do you steam? Pan fry? Deep fry? A quick poll of those I know with Polish heritage resoundingly said sauté in butter and onions. So that's where I began to play, replacing butter with sesame oil and keeping the onions. Lots of onions! While I was at it, I tweaked the dough recipe to include whole grains like spelt and buckwheat and whole wheat. At this point, I'm sure traditionalists might abandon calling this a pierogi, but I'm pretty sure, whatever the name, they'd still call it delicious.


Kimchi Pierogi Potstickers

makes 4-5 servings, around 40 dumplings

Dough:
1 cup all-purpose flour, plus more for rolling
½ cup whole wheat flour
¼ cup buckwheat four
¼ cup spelt flour
1 teaspoon salt
1 large egg
up to 1 cup lukewarm water (you won't use all of it)

Filling:
12 oz prepared kimchi, drained (reserve liquid) and chopped

In exchange for this jar below, I bartered half a batch of pierogi with The Brinery CFO, David Klingenberger. Thank you, David!


To cook:
1 white onion, sliced into super thin rounds
2 cups water
2 TBS sesame oil
1 tsp (or less depending on taste) salt
fresh parsley to garnish

Dipping sauce:
reserved liquid from kimchi mixed with an equal portion of shoyu (my preference) or soy sauce and a few drops of sesame oil

Method

Combine the flours and salt in a large bowl (or on a work surface) and make a well in the center. Break the egg into the well and add a little lukewarm water at a time (½ cup was sufficient for me). Bring the dough together, kneading well and adding more flour or water as necessary, but keeping in mind that you are aiming for soft dough. Cover the dough with a bowl or towel. Let rest 20 minutes.

On a floured work surface, roll the dough out thinly (about ⅛-inch thick) cut with a 2-inch round cutter. Spoon about 1 teaspoon of the filling into the middle of each circle. Fold dough in half and pinch edges with the tines of a floured fork to seal. Gather scraps, re-roll and fill. Repeat with the remainder of the dough.


At this point you can freeze the pierogi for later use. Freeze in a single layer on a sheet pan for at least 30 minutes. When completely frozen transfer to a freezer-rated zip-top plastic bag and store up to 3 months.


When ready to cook:

In a wok (or large skillet) over high heat, bring water, sesame oil, sliced onions, and salt to a boil. Add pierogies in a single layer. Reduce heat to med-high. Cook, uncovered, until all the liquid is absorbed and the pierogies begin to sizzle, about 15-20 minutes.

Continue to cook 3-5 minutes more, shaking the pan often without turning pierogies, until golden and crisp on the bottom. You may find you need to rearrange the pierogies for even browning, but resist the urge to turn them over.

Carefully pry the potsickers from the pan with a thin spatula. Serve with the kimchi-soy dipping sauce.