

I often contribute recipes to the blog of my friends' tea company, Arbor Teas. Here is the latest recipe I developed using a few of their teas.
2010 seemed to be the year of DIY in the food world, and I have no doubt that 2011 will continue to be the same. If the reasons are not for putting up (canning, curing, dehydrating, etc.) to preserve the abundance of harvest for leaner times like our great grandparents used to or not meant to ease reliance on commercially-packaged, convenience foods, then it's to satiate the curiosity of how basic foodstuffs are produced and to relish in the pure satisfaction that you can DO IT YOURSELF.
2010 seemed to be the year of DIY in the food world, and I have no doubt that 2011 will continue to be the same. If the reasons are not for putting up (canning, curing, dehydrating, etc.) to preserve the abundance of harvest for leaner times like our great grandparents used to or not meant to ease reliance on commercially-packaged, convenience foods, then it's to satiate the curiosity of how basic foodstuffs are produced and to relish in the pure satisfaction that you can DO IT YOURSELF.
Remember taking turns to shake that jar of cream in kindergarten until it thickened and yielded a soft, spreadable butter? Patience-inducing yet awe-inspiring to a 5-year old. Making cultured butter from scratch is just one step up from that sort of classroom demo magic. And using a modern stand mixer makes it an easily approachable task if your kitchen amenities are sans old-fashioned butter churn and butter bats. Furthermore, fresh, liquid cream presents a blank canvas on which you can layer a custom flavor profile at the very foundation, before churning. You can add cultures for tangy-ness as well as ingredients, like tea, that steep best in liquid without altering the final texture. Compound butters, a different approach to flavored butter where herbs, aromatics, syrups or fruit pastes are mashed into solid butter, while good in there own right, offer only the opportunity for flavor afterthoughts, post-churning.
 So in the spirit of DIY, I present you below with directions for culturing butter and flavoring it using Arbor Teas' oraganic, loose-leaf tea. Cultured tea butter should not be confused with Tibetan butter tea, a yak milk-derived, fortifying hot beverage for the iron-stomached. This is a wholly different dining experience. I chose two very different Arbor Teas to make two unique flavors. The first was organic genmaicha green tea, which is composed of Japanese green tea leaves mixed with toasted brown rice kernels. This tea flavor brings to mind popcorn, and thus lightly salted butter flavored with genmaicha lends itself to savory applications: smeared on crusty bread or slathered on roasted vegetables. The second was organic masala chai tea. Redolent with warm spice and delicately sweetened (post-churn) with honey, this makes a welcome addition to a breakfast table spread or to afternoon tea fare.
As a premium for churning your own butter, you will also produce a good amount of deliciously drinkable, tea-flavored buttermilk. I used the excess to make the tiny corn biscuits pictured above. They were a perfect vehicle to deliver taste tests of homemade tea butter (either sweet or savory) to friends. A note of caution, though, before proceeding: you may start consuming more butter than you ever thought necessary. It's that good!
makes about a ½-pound of butter and about 1 cup buttermilk
2 TBS organic loose tea leaves
2 cups heavy cream (the best quality you can find: highest butterfat, least pasteurized)
2 heaping TBS plain whole-milk yogurt, crème fraîche or buttermilk (be sure these do not contain any additive gums or stabilizers)
ice
⅛ - ¼ tsp flaky sea salt
1 TBS (or more to taste) honey (optional)
Make a tea sachet by packing the loose tea leaves in a tea sac or other type of disposable filter and tying securely with kitchen twine. Place the tea sachet in a clean glass mason jar. Pour the heavy cream and yogurt over the tea. Stir to combine. Cover loosely and place it in a warmish part of the house - the ideal temperature is around 75° F, but anywhere in the range from 70-80° F will work.
After 12-18 hours, the cream should be noticeably thicker and should taste slightly tangy. If it hasn't thickened yet, leave it alone for another few hours and eventually it will. When your cream has thickened, remove the tea sachet and scrape off any thickened cream that may adhere to the filter, adding this back to the cream. If you are not ready to make your butter right away, transfer the container to the fridge where you can leave it for up to another 24 hours.
When ready to churn the cream, remove it from the fridge and allow it to stand at room temperature until it reaches about 60° F. If you're making it from room temperature you'll need to place the bowl in a bath of ice water for a few minutes to cool it down.
Fill another large bowl with water and ice cubes and set this aside.
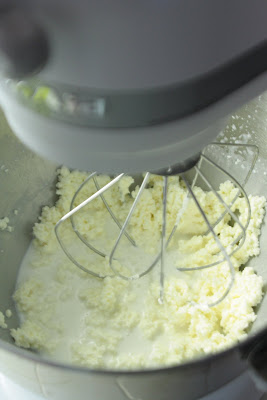
Pour the cream into the bowl of a stand mixer and beat at high speed using the whisk attachment. A hand-held electric beater or even whisking vigorously by hand will also work. When the cream starts to form stiff peaks (see picture below at left), reduce the speed to low. Watch carefully, first the peaks will start to look grainy, and a few seconds later the cream will break. When it does, clumps of pale yellow butterfat will form leaving a pool of buttermilk in the bowl (see picture below at right). Stop beating. Carefully strain the bowl over a cup to drain away as much buttermilk as possible. Reserve the buttermilk for another use.

Next the butter must be washed with ice water to remove any residual buttermilk, which could cause the butter to spoil prematurely. If using a stand mixer, switch the whisk attachment for the dough hook. If you don't have a stand mixer, a fork or a stiff rubber spatula will do. Pour some of the reserved ice water over the butter, kneading it vigorously. The water will turn cloudy and the butter will seize up, making it cohere and knead more easily (see before and after pictures below). Pour out the liquid and repeat as many times as needed (about 3-4 times) until the rinse water in the bowl is completely clear. After the last of the rinse water has been poured off, continue kneading for a few more minutes to get as much water as possible out of the butter. Pour off any residual liquid. Add the salt (and honey, if using) now and continue to knead until completely incorporated.


Pack the cultured tea butter into ramekins or shallow jelly jars, roll it in parchment paper, or use it to fill shaped molds before covering tightly and refrigerating. Place in the freezer for longer term storage.
No comments:
Post a Comment