custom cakes/cookies

Thursday, September 30, 2010

Amy Atlas Wannabe


Last week my friend Jo got married. The wedding venue was a spectacular farm, complete with gorgeous barns, rolling hills, and a peaceful lake. Jo hired a super talented florist and one of the best local caterers in town. Heather (Sweet Heather Anne) and I were lucky enough to be asked to do an Amy Atlas-esque dessert table for the reception. Jo was such a laid back bride and gave everyone a lot of creative freedom to work within her vision. Her theme was a series of playful vignettes, packed with the charm and vintage worthy of a photo spread in Once Wed. Here's a peek at her penny candy table. See what I mean? Adorable!


And this is how the dessert table turned out. To pull the look together, Heather and I used various cake stands, jadeite platters, metal canisters, and a lovely floral tablecloth from Jo's collection of vintage treasures.


Heather made the cakes, three total and each a different flavor; I made the pastries; and together, we made 8 dozen painted sugar cookies!


The cake design was inspired by Jo's wedding attire, a striking teal mermaid gown with ruching from bodice to floor and a peacock feather hair piece.


The cake flavors were a ginger sour cream cake layered with apricot-ginger jam and topped with a vanilla buttercream, a caramel cake with praline crunch buttercream, and a rich chocolate cake with mexican-spiced chocolate ganache.


In addition to cake and cookies, beautifully rustic apple and raspberry pies made by Helen and Blake of EAT catering also had prominence on the table.


The pastries included chocolate dulce de leche bars, mexican wedding cookies, and brown butter spoon cookies sandwiched with either my homemade raspberry or apricot jams.


A small detail of which I'm most proud for the display is the signage. I was stumped by how to prop up the labels and disenchanted with the numerous cheesy place card holders available for purchase.


Then DIY inspiration hit. When looking through Jo's vintage tableware collection, I saw these: rusty mattress springs with alligator clips welded to the tips meant to be used to display the table numbers.


I made a miniature version by twisting 18-gauge copper wire into the necessary shape. Then, to eliminate the shiny, new-penny look, soaked the wires in a "tarnishing" solution borrowed from a jewelry-making friend to give the perfect brown/black patina.


Making this table (every step from concept to execution) was so much fun! A perfect use of my interests and talents. It would be a dream to quit my day job and instead do this full time. Watch out Amy Atlas, one day I may just get the courage to take the leap...

Sunday, September 26, 2010

two birds...

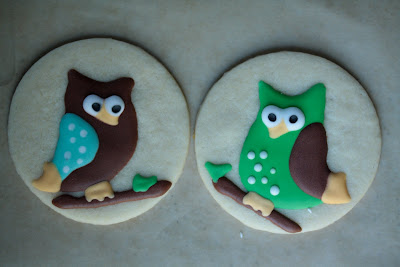
I might have a thing for owls...

so naturally, I was super excited when my friend Amanda asked me to make owl-themed sugar cookies for a baby shower. Coincidentally, the daring bakers challenged us to make September-themed sugar cookies. Owls are autumnal...right?


The September 2010 Daring Bakers’ challenge was hosted by Mandy of “What the Fruitcake?!” Mandy challenged everyone to make Decorated Sugar Cookies based on recipes from Peggy Porschen and The Joy of Baking.

Below is my tried and true recipe for sugar cookies. I prefer the flavor and the dough is easy to work. Peggy's recipe doesn't use a leavener, which may be important if you wish to preserve a flat decorating surface or have cookie cutters with intricate edges.

Iced Sugar Cookies
Makes about 6 dozen cookies

3 cups flour
1½ tsp baking powder
½ tsp salt
2 sticks plus 3 TBS unsalted butter, softened
1 scant cup of sugar
1 egg
1 TBS milk
2½ tsp vanilla
¼ tsp lemon zest

Whisk together flour, baking powder, and salt in a large bowl. In a separate bowl, beat together butter and sugar until fluffy and well blended. Add egg and mix until combined. Mix in milk, vanilla, and lemon zest. Gradually stir in flour mixture until well blended. Refrigerate dough until cold (at least one hour or up to several days).

Preheat oven to 375° F.
Roll out dough on floured surface to ⅛-in thickness . Cut out desired shapes and place on parchment-lined baking sheets. Chill cut cookies for ~10 minutes in the refrigerator and then transfer baking sheet to the oven. Bake 8 minutes or until edges are golden. Allow cookies to cool completely before icing.

Royal Icing

4 - 6 cups powdered sugar
4 large egg whites
4 tsp lemon Juice
2 tsp flavored extract, optional
food coloring

Beat egg whites with lemon juice until combined. Sift the icing sugar to remove lumps and add it to the egg whites. Beat on low until combined and smooth. Add desired amount of food coloring and mix until homogenous. Use immediately or keep in an airtight container.

Two amounts of icing sugar are listed. The lesser amount is good for a flooding consistency, and the larger amount is for outlining, but you can add even more for a much thicker consistency good for writing. If you add too much icing sugar or would like to make a thinner consistency, add very small amounts of water, a few drops at a time, until you reach the consistency you need.

Tuesday, September 14, 2010

Million Dollar Butter


Late last summer, I started what I think just may become a tradition. Or ritual? Or right of season's passage? Well, maybe...

I made pear butter.

There's an unkempt pear tree in the field behind my home. The first year I noticed it, I picked so many, climbing first a tall ladder and then higher, straight up the branches. I picked and picked and then fretted each day after. "Are they ripe yet?" Pears ripen best off the tree. The technical term is climacteric. Like waiting for bananas to ripen, this may not seem like a big deal to let your harvest ripen here and there at a snail's pace, especially if you're just consuming out of hand as a snack. If your intention is to can them at peak flavor, though, the trick is to get the bulk to ripen simultaneously, and preferably on a not-so-busy weekend. That wasn't the case my first time around...

The reality for pears: the zenith of perfect ripeness seems to last an all too brief second before rot sets in. The reality of this recipe I'm sharing below: possibly every pot and pan in your kitchen will be used and a vigilant eye and stir-happy hand is required to monitor simmering for a couple of hours.

For the fretting over ripeness, for making this recipe the same day as hosting a largish dinner party, for stemming and quartering a way too ambitious quantity of fruit, for the passing through a food mill, not once, but twice to ensure proper consistency, for the stirring and simmering for hours in a hot kitchen, for the precious pear butter-full half-pint jar that broke irreparably in the hot water bath when being processed for storage and thus had to be thrown out, is why I've started charging $$$$/jar. No other jam has caused me this much hassle....or been received so well by friends!

Nah, I don't really charge. Like most everything else I make in my kitchen, I freely give it away, but I am sure to let its recipients know how much its worth in labor. Thankfully, they're quick to let me know that value I'm estimating matches in flavor.

Hopefully this doesn't deter you from trying to make it yourself. I bet you can find ways to make it less labor intensive! This year's batch went a little smoother, and I've got next year to look forward to further streamlining my technique.


Spiced Pear Butter
make 1½ quarts

6 lbs barlett pears, rinsed, stemmed and quartered, if you plan to use a food mill, don't bother to peel or core
¾ cup pear brandy
the juice of one lemon
1 cup turbinado sugar
6 orange slices
2 lemon slices
2 vanilla beans, split length wise, seed scraped
2 cinnamon sticks
9 cardamom pods
6 whole cloves
2 pinches of sea salt

Combine the pears, brandy, and lemon juice in a large preserve pan. Cover and simmer until the pears are soft, about 25 minutes. Lift the lid to occasionally give the pears a stir and push unsubmerged pears into the liquid. When soft, pass the pears through the coarsest setting of your food mill or coarse sieve to remove the peel. Then pass through the finest setting of the mill or transfer to a food processor to puree.

Return the puree to a large, heavy saucepan. Add remaining ingredients. Stir over low heat until the sugar dissolves. Increase the heat to medium and boil ever so gently until the mixture thickens and mounds slightly on the spoon. This could take 1 to 1½ hours depending on the juiciness of the pears. Stir often to prevent burning the bottom.

Discard fruit slices and spices. Ladle pear butter into hot canning jars, filling only ¼ inch from the top. Using a cloth dipped in hot water, wipe the rim free of drips. Place lids on jars and seal.

Arrange the jars in a pot of boiling water so that at least one inch of water covers the tops. Boil rapidly for 15 minutes. Remove the jars and cool to room temperature. Press the center of each lid. If any lids pop up, store these in the refrigerator. Sealed jars will keep at room temperature for up to one year. Refrigerate after opening.

The September 2010 Daring Cooks’ challenge was hosted by John of Eat4Fun. John chose to challenge The Daring Cooks to learn about food preservation, mainly in the form of canning and freezing. He challenged everyone to make a recipe and preserve it. John’s source for food preservation information was from The National Center for Home Food Preservation.