custom cakes/cookies

Monday, June 7, 2010

Brioche Baguettes with Jefferson Market Nostalgia


Do you remember Jefferson Market the way it used to be when Jean Henry owned it? If you do, consider yourself lucky. Sadly, it changed ownership before my arrival to Ann Arbor. My friends talk fondly of this popular bakery shop in its heyday. It was a favorite neighborhood hangout: a good location to run into friends, catch up on weekend gossip, and eat amazing pastries while lounging in the adjacent garden.

One fond memory involved eating brioche baguettes, a brioche dough-based pastry filled with vanilla cream and chocolate chunks. Jean was kind enough to share her recipe with my baking friends. (A perk of living in a small town; someone always knows someone...) Last Saturday, while sharing a stellar brunch from items collected that morning at the farmers' market, Susie, Shana, Shannon, Elizabeth, Emily, and I made the baguettes with great success. Elizabeth beautifully documented the day in pictures, which can be viewed here.

If you're appetite is whetted, and you are interested in making these yourself, then read on...

For the Brioche:
link to recipe source
Makes about 2¼ pounds dough

The Sponge
⅓ cup warm whole milk (100 to 110° F)
1½ tsp instant yeast
1 large egg, at room temperature
2 cups unbleached all-purpose flour

Put the milk, yeast, egg and 1 cup of the flour in the bowl of a heavy-duty mixer. Mix the ingredients together with a rubber spatula, mixing just until everything is blended. Sprinkle over the remaining cup of flour to cover the sponge.

The Rest
Set the sponge aside to rest uncovered for 30 to 40 minutes. After this resting time, the flour coating will crack, your indication that everything is moving along properly.


The Dough
⅓ cup granulated sugar
1 tsp kosher salt
4 large eggs, at room temperature and lightly beaten
1½ cups (approximately) unbleached all-purpose flour
1½ sticks (6 ounces) unsalted butter, at room temperature

Add the sugar, salt, eggs, and 1 cup of the flour to the sponge. Set the bowl into the mixer, attach the dough hook, and mix on low speed for a minute or two, just until the ingredients look as if they’re about to come together. Still mixing, sprinkle in ½ cup more flour.


When the flour is incorporated, increase the mixer speed to medium and beat for about 15 minutes, stopping to scrape down the hook and bowl as needed. During this mixing period, the dough should come together, wrap itself around the hook, and slap the sides of the bowl. If, after 7 to 10 minutes, you don’t have a cohesive, slapping dough, add up to 3 tablespoons more flour.


Continue to beat, giving the dough another full 15 minutes in the mixer – don’t skimp on the time; this is what will give the brioche its distinctive texture.

Warning
Be warned – your mixer will become extremely hot. Most heavy-duty mixers designed for making bread can handle this long beating, although if you plan to make successive batches of dough, you’ll have to let your machine cool down completely between batches.


Incorporating the butter
In order to incorporate the butter into the dough, you must work the butter until it is the same consistency as the dough. You can bash the butter into submission with a rolling pin or give it kinder and gentler handling by using a dough scraper to smear it bit by bit across a smooth work surface. When it’s ready, the butter will be smooth, soft, and still cool – not warm, oily or greasy. With the mixer on medium-low, add the butter a few tablespoons at a time. This is the point at which you’ll think you’ve made a huge mistake, because the dough that you worked so hard to make smooth will fall apart – carry on.


When all of the butter has been added, raise the mixer speed to medium-high for a minute, then reduce the mixer speed to medium and beat the dough for about 5 minutes, or until you once again hear the dough slapping against the sides of the bowl. Clean the sides of the bowl frequently as you work; if it looks as though the dough is not coming together after 2 to 3 minutes, add up to 1 tablespoon more flour. When you’re finished, the dough should still feel somewhat cool. It will be soft and sticky and may cling slightly to the sides and bottom of the bowl.


The First Rise
Transfer the dough to a very large buttered bowl, cover tightly with plastic wrap, and let it rise at room temperature until doubled in bulk, 2 to 2½ hours.


The Second Rise and Chilling
Deflate the dough by placing your fingers under it, lifting a section of the dough, and then letting it fall back into the bowl. Work your way around the circumference of the dough, lifting and releasing. Cover the bowl tightly with plastic wrap and refrigerate the dough overnight, or for at least 4 to 6 hours, during which time it will continue to rise and may double in size again. After this long chill, the dough is ready to use in any brioche recipe. This recipe yields enough brioche dough for 3 têtes or 3 loaves.

Storing
If you are not going to use the dough after the second rise, deflate it, wrap it airtight, and store it in the freezer. The dough can remain frozen for up to 1 month. Thaw the dough, still wrapped, in the refrigerator overnight and use it directly from the refrigerator.


Putting It All Together:

1 recipe brioche dough
1 recipe vanilla pastry cream (see end of post for recipe)
8 ounces good quality semi-sweet chocolate chunks

Roll out defrosted or freshly-made (2 rises and deflated) brioche dough into a rectangle about 12" x 18" x ¼" deep on a floured surface.


Spread a ⅛" layer of pastry cream across the top leaving a ½" clean on each 18" side. Sprinkle chocolate chunks, in an even layer on top of the pastry cream. Be sure to leave space between chocolate pieces as too many will make the dough difficult to cut.


Fold dough into thirds along the 18" side, sealing by pressing with fingers along the clean edge. This leaves a 6" x 18" piece of dough with filling inside.


Make baguettes by cutting along the 18" length every 1½" creating 9 or more rectangles depending on the length you rolled the dough. Place on a parchment covered sheet pan, with plenty of room for rising left between the baguettes.


Preheat oven to 375° F. Allow baguettes to rise at room temperature to double their size (about 30 minutes), then bake for 10-15 minutes until lightly brown. Allow to cool for 10 minutes before removing to a wire rack to finish cooling. Store at room temperature and consume within 12 hours of baking.

To freeze and serve up to one month later:
Freeze the filled and cut baguettes immediately (before rising) directly on the parchment-lined sheet tray for about 30 minutes. Once frozen, remove from tray and place in freezer-quality zipper storage bags. When ready to bake, remove as many baguettes as you'd like and place onto a parchment covered sheet tray. Allow the baguettes to fully defrost in the fridge overnight, then bring to room temperature, so that the baguettes rise to double their size. Bake as directed above.


Vanilla Pastry Cream
yield: ~1½ cups
1 cup (240 ml) whole milk
2 TBS (16 g) cornstarch
¾ cup (100 g) granulated sugar
1 large egg
2 large egg yolks
2 TBS (30 g) unsalted butter, at room temperature
1 tsp vanilla bean paste

Dissolve cornstarch in 2 TBS of milk. Combine the remaining milk with the sugar in a saucepan; bring to boil; remove from heat. Beat the whole egg, then the yolks into the cornstarch mixture. Pour a third of the boiling milk into the egg mixture, whisking constantly so that the eggs do not begin to cook. Return the remaining milk to boil. Pour in the hot egg mixture in a stream, continuing whisking. Continue whisking (this is important – you do not want the eggs to solidify/cook) until the cream thickens and comes to a boil. Remove from heat and beat in the butter and vanilla. Pour cream into a bowl. Press plastic wrap firmly against the surface. Refrigerate until chilled, at least 2 hours or up to 2 days. Just before using, whisk by hand until smooth.

Thursday, May 27, 2010

Pièce Montée, it's a showpiece and a lesson in vocabulary

Classic French centerpiece desserts, like the croquembouche, are usually reserved for important occasions, such as weddings or baptisms or communions. But when your favorite hip hop artist, who just happens to adore caramel, invites you to his birthday party, I can think of bringing nothing more appropriate.

The first time I made one of these, I learned that croquembouche meant "crunch in the mouth" since each individual pastry is drenched in hard caramel. This time around I have a new French vocab word to share: pièce montée. Used as a synonym for croquembouche, it translates as "mounted piece". Think pastry architecture, or rather, the deft assemblage of sugar and cream puffs into an impressive, sculpted form.

While a lofty tower of profiteroles is pretty amazing to look at, cutting into one to serve is another challenge entirely. The profiteroles are physically "glued" together with hard candy, making it tough work to gracefully disassemble. Last time, we attacked it rather clumsily with a serrated knife. I've read that others have taken a chisel and hammer to crack the hard surface. YIKES!

This time around, to facilitate sharing as an eat-out-of-hand casual party dessert, I decided to keep the caramel-dipped profiteroles separate (not touching) and flat on a single sheet tray. No sticking together (which, turns out, is pretty hard to unstick)...no montée...just pièce. The height would come, at least I was hoping with fingers crossed, from the fancy sugar work spun on top. I spent a few nights studying sugar techniques in this textbook as preparation, hoping to create something extraordinary.

But when the day came to make this, it rained. That brings me to another vocab word: hygroscopic. Sugar is hygroscopic meaning it will absorb water from the surrounding air. See those beads of liquid on the sugar strands in the photo up above?! It was dissolving faster than I could finish! I decided to cut the decoration short, and instead poured JD's initials with the remaining caramel and sprinkled the finished piece with crystallized lilacs. Not quite the pièce montée I envisioned, but I was told it was delicious all the same.

The May 2010 Daring Bakers’ challenge was hosted by Cat of Little Miss Cupcake. Cat challenged everyone to make a pièce montée, or croquembouche, based on recipes from Peter Kump’s Baking School in Manhattan and Nick Malgieri. Instead of the suggested recipes, I followed closely the instructions in Bo Friberg's The Advanced Professional Pastry Chef with great success. I was particularly proud that my profiteroles did not deflate.

Vanilla Crème Patissiere
yield: ~3 cups

2 cups (480 ml) whole milk
4 TBS (32 g) cornstarch
1½ cups (200 g) granulated sugar
2 large eggs
4 large egg yolks
4 TBS (60 g) unsalted butter, at room temperature
2 TBS vanilla bean paste

Dissolve cornstarch in ¼ cup of milk. Combine the remaining milk with the sugar in a saucepan; bring to boil; remove from heat.

Beat the whole egg, then the yolks into the cornstarch mixture. Pour ⅓ of boiling milk into the egg mixture, whisking constantly so that the eggs do not begin to cook.

Return the remaining milk to boil. Pour in the hot egg mixture in a stream, continuing whisking.

Continue whisking (this is important – you do not want the eggs to solidify/cook) until the cream thickens and comes to a boil. Remove from heat and beat in the butter and vanilla.

Pour cream into a bowl. Press plastic wrap firmly against the surface. Chill immediately and until ready to use.

Pâte à Choux
yield: ~60 (1-inch) profiteroles

2 oz (57.5 g) cake flour
2¾ oz (77.5 g) bread flour
1 cup (240 ml) water
6 TBS (85g) unsalted butter, cut into pieces
¼ tsp (1.25g) salt
5 large eggs (1 cup), at room temperature

Sift the flours together on a sheet of parchment paper and reserve.

In a heavy-bottomed medium saucepan, bring the water, butter, and salt to a full rolling boil so that the butter droplets are dispersed throughout the liquid. Form the ends of the parchment into a funnel/cone shape; use this to pour the flour into the liquid while stirring constantly with a wooden spoon. Add the flour as fast as it can be absorbed, but avoid adding it once, which may create lumps. Continue cooking, stirring vigorously until the mixture forms a smooth, dry mass and pulls away from the sides of the pan, about 2-3 minutes.

Transfer the dough into the bowl of a mixer fitted with a paddle attachment (you can also continue by hand). Let the dough cool while mixing on low for a couple of minutes so that the eggs do not scramble.

Once the dough has slightly cooled, begin to add the eggs one at a time. The dough will separate in the beginning, but it should come back together after the 3rd or 4th egg.

While the dough is still slightly warm, transfer it to a piping bag and pipe onto parchment lined baking sheets into shapes slightly larger than a cherry. Use a finger dipped in warm water to pat down any peaks.

Bake at 425° F until fully puffed and starting to show some color, about 10 minutes. Reduce the heat to 375° F and bake about 10-12 minutes longer or until golden brown and dry. Turn off oven and leave door open with puffs remaining on the oven racks puffs. Allow them to cool completely to room temperature before removing. This should encourage steam to escape and prevent the puffs from deflating.

Once cool, make a small hole in the bottom of each profiterole. Using a pastry bag fitted with a No. 2 tip, fill each with the pastry cream.

Caramelized Sugar
yield: 2¼ cups

1 cup (240 ml) water
2 lbs (910 g) granulated sugar
¼ cup (60 ml) light corn syrup

Fill a bowl large enough to hold the pan used for cooking the sugar with enough cold water to reach halfway up the sides of the pan. Set this aside.

In a medium saucepan, combine 1 cup water and sugar and set over medium-high heat. Stir until the sugar dissolves and use a brush dipped in water to wash down any sugar crystals that stick to the side of the pan. Bring to a rolling boil, add the corn syrup, then lower the heat to medium. Do not stir once the sugar starts boiling. Instead, continue brushing down the sides of the pan with water as needed until the sugar reaches 280° F. Keep boiling until the syrup is amber in color. Quickly remove the pan from heat and dunk the bottom in the bowl of cold water to stop the cooking process.

Using 2 forks, dip the tops and sides of each cream-filled puff into the caramel, and arrange puffs as desired.

To make a spun-sugar web to decorate the croquembouche:
Cut the looped ends of a wire whisk with wire cutters, or use two forks held side by side, and dip the ends into caramel. Wave the caramel back and forth over the croquembouche, allowing the strands to fall in long, thin threads around it. Wrap any stray strands up and around the croquembouche.

Serve within 2 hours.

Monday, May 17, 2010

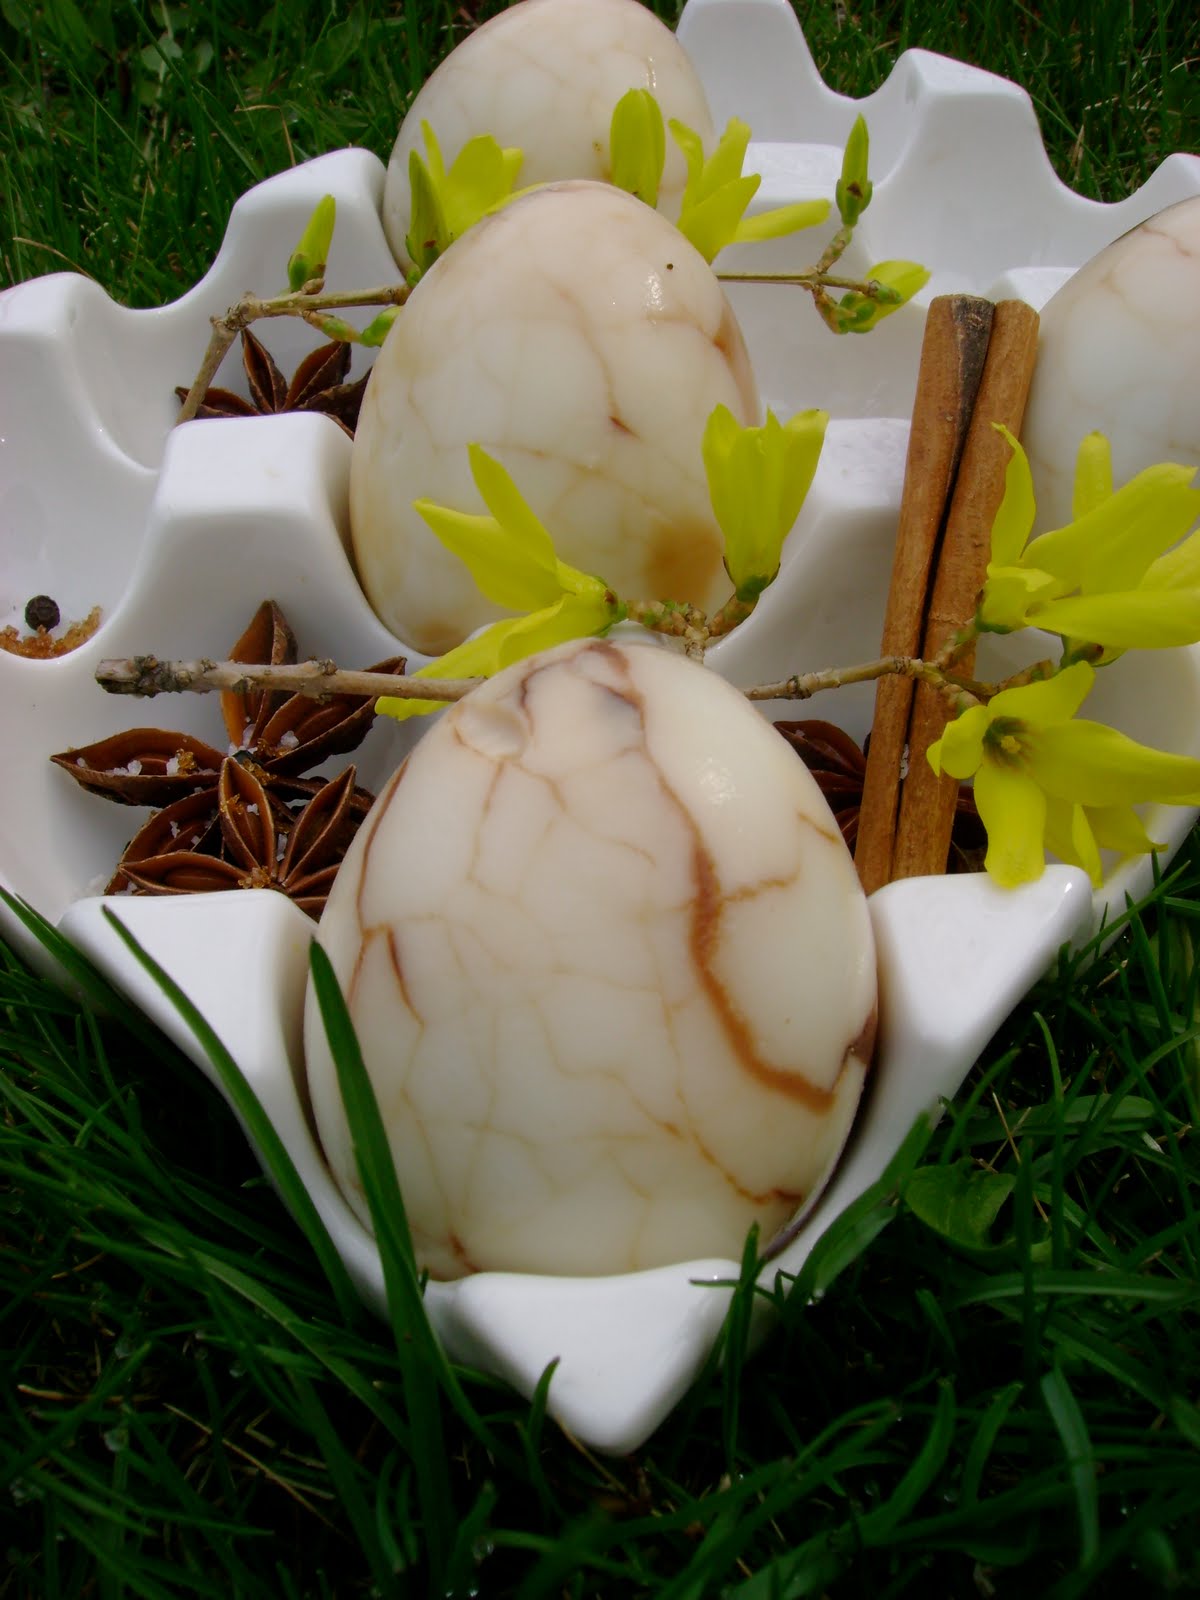
Chinese Tea Eggs - 茶叶蛋 (cháyèdàn)

I often contribute recipes to the blog of my friends' tea company, Arbor Teas. Here is the latest recipe I developed using one of their teas.

A tea egg is a traditional snack food commonly sold by street vendors or in markets throughout Chinese communities. It's a hard-cooked egg steeped with tea leaves and traditional Chinese spices, which adds a savory, slightly salty tone to a normally neutral flavored source of protein. The shell cracking method is an important feature in this recipe that not only lends to a beautiful design, but allows the tea and spices to seep into the egg white. The tea used for making tea eggs is usually high in dark-brown tannins. Pu-erh is commonly used, but it can be substituted with any black tea leaf. Green tea is often considered too bitter, but may be worth trying if you'd like to explore the effects of the marbling pattern from an entire color palate of organic loose leaf teas from Arbor Teas.

I like the idea of imparting unique flavors directly to a hard-cooked egg, but I'm not one to eat such things directly out of hand. A quick poll of the egg-eating habits of some friends, however, confirms that I seem to be in the minority. In any case, if you're like me and prefer to incorporate hard-cooked eggs into other recipes here are a few suggestions to take tea-steeped eggs to the next level:

  • Sieved over roasted fresh asparagus or a salad of spring greens. Press the eggs through a strainer, or grate on the finest facet of a box grater to create mimosa flower-like bits.
  • Deviled with whole-grain mustard and cream fraiche to serve at you next picnic or barbeque
  • Mashed with olive oil and sea salt. Enjoy as creamy sandwich filling between slices of crusty bread
  • Stirred into a sauce gribiche, a vinaigrette bound with chopped hard-cooked egg, shallots, capers and herbs that makes a fine complement to roasted potatoes or grilled fish

Chinese Tea Eggs

6 eggs
2 TBS organic loose leaf Pu'erh
¾ cup soy sauce
2 tsp sea salt
2 tsp dark brown sugar
4 pieces star anise
1 cinnamon stick
1 tsp cracked black peppercorns
2 strips dried tangerine or mandarin orange peel (optional)

Place the eggs in a medium-sized pot with enough cool water to cover by 1-inch. Bring the water to a boil, then lower heat to simmer for 3 minutes.

Remove the eggs with a slotted spoon and place in a bowl of cool water. Reserve the simmering water in the pot for use in the next step of the recipe. When cool enough to handle, take the back of a spoon and gently crack the eggs evenly all around the shell. Take care when cracking to leave the shell intact. This allows the dark steeping liquid to seep into the egg white, staining it with a marbled design. The more you crack, the more intricate the design will be.

Add the remaining ingredients to the pot of simmering water, stirring to combine. Return the cracked eggs to the pot as well. Bring the liquid to boil again, then reduce the heat to low and simmer for 40 minutes. Turn off the heat and cover the pot with a lid. Let the eggs steep for a few hours to overnight. The longer the eggs steep, the more intense the flavor and color will be.

Drain the eggs, peel and serve. Unpeeled eggs can be refrigerated in a covered container for up to 4 days.

Friday, May 14, 2010

In defense of dried beans… and an ancient recipe

A friend recently said she didn’t see the merits of using dried beans. I used to feel the same way. Mostly I think because cooking beans seemed laborious and intimidating. It was so much easier to hurry the food prep process along by just cranking open a can. Then I stumbled upon Rancho Gordo and their amazing variety of heirloom beans. Almost instantly, I was converted. Yes, yes dried beans are economical and by cooking them yourself you can control the use of additives (like sodium or MSG). But beyond the well-worn black bean and pinto, etc., that are so easy to come by in a can, heirloom varieties offer a unique flavor and visual profile that hasn’t yet made its way to tins on grocery store shelves. If you want to partake in consuming these beauties, you’re gonna have to learn to cook them yourself.

There are many different methods/philosophies for cooking beans. But they all come down to a matter of simmering the pot until the beans are soft. A pre-soak speeds up the process but isn’t absolutely necessary. The cooking time will just take a lot longer. Adding a few savory vegetables, sautéed in some kind of fat or braised in stock, will make them more flavorful. Although, heirloom and heritage varieties really don't need a lot of fussing if they are used fresh. If you do soak the beans, keep the soaking water and continue to use it to cook the beans. It contains vitamins and flavor, leeched from the beans during the soaking period, so it’d be a shame to just throw that down the drain. I usually set the beans to soak overnight and then keep them at a gentle simmer in the background of morning spent doing other things. They hardly need any supervision and fill your house with a welcome, heady aroma. All this for the price of a little pre-planning! I’ve decided it’s completely worth it.

Last week, I cooked up Ayocote Morado beans, a rare Mexican runner bean, for use in a favorite Budín Azteca recipe I clipped from a Martha Stewart magazine several years ago. Budín Azteca, which translates into “pudding or pie of the Aztecs”, is a casserole-type dish that has roots as far back as the 16th century. My version has roasted poblano chiles and fresh, steamed spinach layered between corn tortillas dressed with a homemade salsa verde and bound with Mexican crema and queso fresco. I chose this because the Daring Cooks challenge this month was to make a stacked enchilada with homemade salsa verde:

Our hosts this month, Barbara of Barbara Bakes and Bunnee of Anna+Food have chosen a delicious Stacked Green Chile & Grilled Chicken Enchilada recipe in celebration of Cinco de Mayo! The recipe, featuring a homemade enchilada sauce was found on www.finecooking.com and written by Robb Walsh.

One look at the given recipes for this sent me straight to my personal cookbook shelf. Funny how a picture shapes your perspective on how appetizing food will be. No matter how much cilantro you sprinkle as garnish on top, drab colors just don’t photograph well!

I firmly believe that some things are well-worth bending/breaking the “rules”. So this month, I did things a little differently. Here's my interpretation of the challenge:

Roasted Salsa Verde
makes 3 cups

1 teaspoon dried Mexican oregano
4 fresh Anaheim chiles (about 6 to 8-inches long)
1½ pounds tomatillos, husks intact
1 medium white onion, cut into ¼-inch thick rounds
4 large cloves garlic, unpeeled
2 serrano chiles
1 jalapeno
juice from one lime
salt
cilantro for garnish

In a large dry skillet over medium heat, toast the oregano until fragrant, 1-2 minutes, then remove from skillet and set aside.

To the same skillet, add the tomatillos, onion slices, garlic cloves, and chiles. (If not all fit at once in the same pan, then roast in batches.) Place the garlic at the hottest part of the pan as it will take the longest to cook. Cook slowly, turning occasionally, until soft and aromatic. The timing for each vegetable will be different, so keep a close watch that they don’t burn. As each item is finished remove it from the heat. Once cool enough to handle, peel the garlic cloves, cut the stems from the chiles, leaving the seeds if you prefer a spicy heat to your salsa, and remove the husks from the tomatillos.

Meanwhile, roast the Anaheim chiles over the open flame of a gas burner, under a broiler set close to the element, or on a grill. Turn occasionally until evenly charred. When black and blistered, remove from heat and place in a paper bag. Roll the bag shut and set aside until cool, about 10 minutes. Once cool enough to handle, peel away the skin and remove the ribs and seeds.

Combine the chiles, onion, garlic, tomatillos, and oregano in a food processor or blender or molcajete. Grind until well blended; yet allow some texture to be retained. Add the lime juice and salt to taste.

Budín Azteca (stacked tortilla pie)
serves 8-10

1 lb dried beans, picked over; I used Ayocote Morado but any Mexican-style bean will do
1 small white onion
2-3 garlic cloves

4 fresh poblano chiles
18 (6-inch round) fresh corn tortillas
7 TBS olive oil
10 oz fresh spinach, rinsed and tough stems removed
1 small onion, very thinly sliced
4 garlic cloves, minced
1 cup Mexican crema or sour cream
2¼ cups roasted salsa verde (see recipe above)
1½ cups queso fresco, grated

Rinse the beans in cool water and remove any debris. Place beans in a large pot and cover with several inches of cold water. Set to soak overnight or at least 4-8 hours. When ready to cook, do not drain soaking water, it has a lot of nutrients and flavor. Instead top off with more water to cover the beans by several inches and add a small white onion sliced into 3 parts and 2-3 garlic cloves smashed with the blade of a knife. Bring to a hard boil over medium-high heat. Keep the beans at a steady boil for 5 minutes, then reduce heat to low and cover the pot. Cook beans for 1 or so hours. When you begin to smell them cooking and as they start to soften, gradually add a generous heap (about a teaspoon) of salt to the pot. (Waiting to add the salt midway through cooking prevents the beans from splitting.) It takes awhile for the beans to absorb the salt, so go easy. Cover the pot and continue cooking for about 45 minutes or longer, until desired texture is reached. If the bean water starts to get low, add hot water from a tea kettle. These can be made several days in advance. Keep the cooked beans in their cooking liquid in a covered container in the refrigerator until ready to use.

Roast chiles under broiler or over gas burner flame, until blackened and blistered all over. Transfer to a brown paper bag and roll closed. Set aside for 10 minutes. Peel and discard skins. Remove stems, seeds and ribs. Cut into thin, bite-sized strips and set aside.

Preheat oven to 425°. Brush or spray both sides of tortillas with oil. Arrange on baking sheets and bake just until tortillas begin to bubble, yet still remain soft, 5-7 minutes. Reduce oven to 350°.

Heat a large skillet over medium heat. Wash the spinach and without drying add to skillet. Cover and cook until spinach has wilted, about 2 minutes. Season with a pinch of salt. Remove from heat, let cool slightly, then squeeze out as much liquid as possible. Coarsely chop and then set aside.

Heat about 2 TBS oil in the same skillet over medium heat. Add sliced onion and a generous pinch of salt. Cook stirring occasionally until translucent, about 3 minutes. Stir in poblano chiles cooking 1 minute longer. Transfer to a bowl.

Drain the beans, reserving the cooking liquid. Heat another 2 TBS of oil in the same skillet. Cook garlic for 30 seconds until golden and fragrant. Add beans and a generous pinch of salt. Cook, mashing and turning beans over in the pan to incorporate the garlic for about 2 minutes. If the mixture seems dry, add in a bit of the reserved bean cooking liquid and continue to mash until reaching the desired consistency. Remove the pan from the heat.

Line the bottom of a deep round baking dish with a third of the (~6) tortillas. I like to use two 6-inch round, 3-inch deep cake pans and stack 3 tortillas between each layer. Spread the chili-onion mixture on top of the tortillas, then distribute half of the bean mixture and half of the crema over this. Spread ¾ cup salsa on top and sprinkle with ½ cup of cheese. Repeat for the second layer using spinach instead of the chiles. Top with the remaining tortillas, ¾ cup salsa, and ½ cup of cheese.

Bake until heated through (45 minutes- 1 hour). Cover with foil if browns too quickly or is becoming too dry. Let stand 15 minutes before cutting and serve with extra salsa and crema.

Tuesday, April 27, 2010

Happy Birthday, Gingered Rhubarb Puddin'

I'm all for traditional methods of baking, doing things purely from scratch, challenging my notions of what's fit for consumption, and sampling culinary dishes from various cultures. A recent introduction to Mrs. Beeton's Book of Household Management certainly has satisfied all four of these tenets at one fell swoop.

Mrs. Isabella Beeton was a famous British cookery writer of the late 19th century. Married to a publisher of books and popular magazines, she contributed articles on cooking and household management for her husband's publications. Eventually, all 2751 entries were published as a single volume, comprising information in all realms of Victorian British domesticity including tips on how to manage servants and rear children, medical and legal advice, as well as multi-course menu planning and detailed cooking instructions including seasonability and estimated cost of ingredients. Meant as a guide for an aspiring middle class, this compendium is said to be the first cookbook to show recipes in the format to which we are accustomed today. Flipping through the pages of her book, almost immediately, I was enthralled!

So when challenged this month to make a traditional, boiled British pudding, I chose to try a historical recipe from Mrs. Beeton. Rhubarb is in season, so I went with that as a basis for the filling. For never having seen or tasted a steamed pudding, the technique was quite surprising; you make a pastry dough that appears like pie crust, yet when steamed yields a moist cake crumb-like texture. In essence, I made gingered rhubarb-filled muffins.

By far though, the most adventurous aspect of this recipe was the required source of fat: suet. This was an anatomy and species lesson unto its own. Suet is the hard fat located around the loins and kidneys of a cow or sheep or deer. Not just a hardy consumable energy source for winter bird feeders or Arctic explorers, when rendered, it becomes tallow, an ingredient found in Twinkies and McDonald's french fries (before 1990) and candles and soap. Because of it's relatively low melting point, it makes an excellent source of fat for steamed British pastries. The pig and chicken equivalents of tallow are lard and schmaltz, respectively. Good information to file away...

At 80¢/lb (a sure bargain!), I purchased fresh suet from a local grocer and proceeded to rendered it in my kitchen (see bottom of post for instructions). It was an educationally fulfilling yet somewhat disgusting task that emitted a fragrance reminiscent of french fries. Though economical, I'm not sure I could adopt this source of fat in my regular baking repertoire. Sorry Mrs. Beeton, I think I prefer the flavor of butter instead. I've got a bit more tallow left over though in which I'm tempted to fry potatoes, but after that, I'm done.

By the way, today is the first birthday of my blog. Last year on this day, my inaugural post was Lavender-Infused Cheesecake with Crystalized Lilacs. Interesting to see how far this has come and to imagine where next it will go...

The April 2010 Daring Bakers’ challenge was hosted by Esther of The Lilac Kitchen. She challenged everyone to make a traditional British pudding using, if possible, a very traditional British ingredient: suet.

Gingered Rhubarb Pudding
6-8 servings

Sweet Suet Crust
350 g self-rising flour
175 g rendered suet (see below for directions), or suet substitute (i.e., Vegetable Suet, Crisco, Lard)
1 tsp lemon sugar
a pinch of sea salt
210 milliliters

Filling
4-5 stalks rhubarb, ½-in dice
2 TBS crystallized ginger, finely chopped
110 g (4 oz) Lyle's Golden Syrup

Sift the flour, sugar and salt into a large mixing bowl. Coarsely grate the rendered suet on the large holes of a box grater into the bowl. Lightly mix the flour and suet together with fork or pastry blender, forming small pebble-sized pieces.

Mix in the water, a tablespoonful at a time, tossing lightly around the bowl until the pastry just comes together as a sticky and elastic dough. Use your hands to gather the dough into a smooth ball that when swiped around leaves the bowl clean. You may not use the full amount of water, so it is important to add it in small increments. Don’t over handle the pastry or it will become tough and glutiness.

Place the dough on a lightly floured surface. Cut away a quarter of it and put aside to make the lid. Using a flour-dusted rolling pin, roll the larger portion of dough to a fairly thick circle about 13 inches in diameter.

Line a generously buttered, 4 cup capacity pudding basin with the pastry. If making single-sized servings, cut the pastry into individual rounds to fit smaller ramekins. Squeeze and tuck the pastry to fit snugly in the bowl, pressing it evenly all around.

Divide the diced rhubarb, crystallized ginger and golden syrup among each pastry-lined dish, then roll out the remaining pastry to form circular lid(s) large enough to cover the top of the basin or ramekins. Dampen the edges of each pastry lid with a bit of water and position it on top of the pudding. Seal well by crimping its edges. Cover with a sheet of parchment, pleated in the center to allow room for expansion while cooking and folded and tucked firmly around the edges of the basin. A video of this pleating technique can be seen here. The parchment cover can be secured with cooking twine, making a useful handle for lifting in and out of the hot steamer.

Place the pudding basin in a stove top steamer set over boiling water. Be sure the water comes no higher than a third of the way up the pudding basin, so as not to boil over into the pudding, which would create a soggy disappointment. Secure the lid of the pot and steam for 2-2½ hours for a large pudding or 1-1½ hours for individual ramekins. You may need to add more boiling water halfway through or possibly more often if it runs low. There is a lot of leeway in this steaming time. One way to determine that the pudding is sufficiently cooked is when the pastry changes color to a light golden brown. It is hard to over steam a pudding, though, so it can be left steaming for quite some time until you are ready to serve it.

When ready to serve, turn the pudding out of the basin and eat while still warm.

Rendering Suet into Tallow:

Obtain about a half a pound of suet from your local butcher, keep refrigerated until ready to use. With your fingers remove and discard as much of the muscle and membranous casing stuck to the suet. Once picked over, grate the suet on the largest holes of a box grater into a wide skillet. The smaller the bits of suet, the faster it will melt. Slowly heat the skillet over medium-low heat, allowing the fat to melt into a clear liquid and separate from any remaining extraneous bits. This could take up to 20 minutes or more. A fragrance reminiscent of french fries might waft in the air. Like clarifying butter, heating not only separates the proteins from the fat, but also allows any water to evaporate making it shelf stable. Once completely melted, pour the hot liquid through a fine mesh sieve lined with several layers of cheesecloth into a shallow heatproof container. Using the back of a spoon, press on the bits caught up in the cheesecloth to extract as much of the liquid tallow as possible. Allow the tallow to cool completely at room temperature. In its liquid state, tallow appears yellowish. It turns an opaque white at room temperature. Store at room temperature for near immediate use or freeze for long term projects.

Wednesday, April 14, 2010

Brunswick Stew, a southern classic

The day before Easter I cooked a rabbit. What might be considered slightly more offensive is that I fed it to the neighbor kids... in a stew. Before then, I'd never cooked rabbit nor tasted one for that matter. Honestly, I was a little squeamish at the notion of either. I think the timing of the holiday was the exact, cheeky impetus I needed to execute (the traditional approach to) this recipe. Besides, my Easter basket arrived via the US Postal Service a few days early. Really, there was very little to lose.

Recipes for Brunswick Stew vary greatly but it is usually a tomato-based stew containing lima beans or butter beans, corn, okra, other miscellaneous vegetables, and one or more types of meat. Most recipes claiming authenticity call for squirrel or rabbit meat, but for the less adventurous, chicken, pork, and beef are also commonly acceptable. The stew resembles a vegetable soup with meat. What distinguishes Brunswick Stew from vegetable soup, though, is the consistency. Most variations are quite thick, having more meat and vegetables than broth. In fact, it's been said that Brunswick stew is not finished simmering “until the paddle [used to stir it] stands up in the middle” of the pot on its own.

This version of the stew has a distinctly smokey taste imparted by simmering with good quality bacon. The slight gaminess of the rabbit also adds an interesting spiced nuance. Rabbit is actually a fairly lean white meat, so the healthfulness factor is quite favorable. A third element integral to building the flavor of this stew is using a homemade chicken stock. It makes a world of difference, so is worth the little extra effort it entails. My new favorite stock recipe is thoroughly detailed in The Zuni Cafe Cookbook, and a good explanation of Judy Rodgers' tips are given here. A key difference from most other stock recipes is her preference to use a whole, fresh chicken (head and feet included, yet minus the breast meat). I'm quite proud to say I (a person with raw meat squeamishness) made this meat-laden meal, entirely on my own! ...though gratefully the chicken I purchased from my local butcher did not still have its head or feet intact.

One final stew ingredient I used that's worth mentioning is the gorgeous Christmas Lima Beans from Rancho Gordo. These chubby, heirloom beans are true limas originating from Peru. They have a distinct chestnut flavor and taste nothing like the much tinier, green ones I avoided as a kid. If you enjoy cooking with dried beans, Rancho Gordo is a fantastic resource for the more unusual varieties.

The 2010 April Daring Cooks challenge was hosted by Wolf of Wolf’s Den. She chose to challenge Daring Cooks to make Brunswick Stew. Wolf chose recipes for her challenge from The Lee Bros. Southern Cookbook by Matt Lee and Ted Lee, and from the Callaway, Virginia Ruritan Club.

Brunswick Stew
From Lee Bros. Southern Cookbook: Stories and Recipes for Southerners and Would-Be Southerners by Matt Lee and Ted Lee
Serves about 12

¼ lb slab applewood-smoked bacon, thickly sliced
2 Serrano, Thai or other dried red chiles, stems trimmed, sliced, seeded, flattened
1 lb rabbit, quartered, skinned
4-5 lb chicken, quartered, skinned, and most of the fat removed
1 TBS sea salt for seasoning, plus extra to taste
2-3 quarts Homemade Chicken Stock (I recommend the recipe in the Zuni Cafe Cookbook)
2 bay leaves
2 large celery stalks
2 lbs potatoes, diced
1½ cups carrots (about 5 small carrots), chopped
3½ cups onion (about 4 medium onions) chopped
2 cups corn kernels, cut from the cob (about 4 ears) or fresh frozen
3 cups Christmas Lima Beans, cooked and drained
35 oz can whole, peeled tomatoes, drained
¼ cup red wine vinegar
Juice of 2 lemons
Hot sauce to taste

In a 10-12 quart stockpot, fry the bacon over medium-high heat until it just starts to crisp. Transfer to a large bowl, and set aside. Reserve most of the bacon fat in your pan, and with the pan on the burner, add in the chiles. Toast the chiles until they just start to smell good, or make your nose tingle, about a minute. Remove to bowl with the bacon.

Season liberally both sides of the rabbit and chicken pieces with sea salt and pepper. Place the rabbit pieces in the pot and sear off all sides possible. You just want to brown them, not cook them completely. Remove to bowl with bacon and chiles, add more bacon fat if needed, or olive oil, or other oil of your choice, then add in chicken pieces, again, browning all sides nicely. Don't crowd your pieces, especially if you have a narrow bottomed pot. Put the chicken in the bowl with the bacon, chiles and rabbit. Set this aside.

Add 2 cups of chicken stock to the pan to deglaze, making sure to loosen the browned bits stuck to the bottom of the pot. The stock will become a rich dark color. Bring it up to a boil and let it boil until reduced by at least half. Add the remaining stock, bay leaves, celery, potatoes, chicken, rabbit, bacon, chiles and any liquid that may have gathered at the bottom of the bowl they were resting in. Bring the pot back up to a low boil/high simmer, over medium-high heat. Reduce heat to low and cover the pot. Simmer, on low, for approximately 1½ hours, stirring every 15 minutes or so to thoroughly meld the flavors.

With a pair of tongs, remove the chicken and rabbit pieces to a colander over the bowl you used earlier. By this time, the meats will be very tender and may start falling off the bone. Remove the bay leaf, celery, chiles, bacon and discard. When cool enough to handle, carefully remove all the meat from the bones, shredding it as you go. Return the meat to the pot and discard the bones. Add the carrots to the pot, and stir gently, allowing it to come back to a slow simmer. Simmer gently, uncovered, for at least 25 minutes, or until the carrots have started to soften.

Add the onion, lima beans, corn and tomatoes. As you add the tomatoes, crush them carefully. Simmer for another 30 minutes, stirring every so often until the stew has reduced slightly, and onions, corn and lima beans are tender. Remove from heat and add in the vinegar and lemon juice. Stir to blend in well. Season to taste with sea salt, pepper, and hot sauce if desired.

Wednesday, April 7, 2010

Signs of Spring...


A fresh batch of painted sugar cookies from Heather and Olivia take shape as butterflies and snails to herald the arrival of Spring.

Please believe us when we say this technique is super easy. Recipes and inspiration can be found here and here and here and here. Custom orders are welcome as well...

Here's a few more photos of our favorites: