custom cakes/cookies

Tuesday, March 1, 2011

Vegan Papas Rellenas

A few weeks ago I had a pot luck brunch with friends. The agenda was to plan a community garden in my backyard. There was still snow on the ground, but I was thinking warmer thoughts of digging up dirt and pushing in seeds. My contribution to the meal were these fried Peruvian potato thingys over mixed salad greens. While a more traditional version would be filled with spiced beef, I chose the vegan route and filled them with quinoa, beans, raisins and kale. Sounds like a weird combination, but it works. A dash of hot sauce and a topping of pickled onions (salsa criolla) add a whole lot more flavor.

Not sure how many to feed, I doubled the recipe. I don't recommend this unless you enjoy potato ricing or have an army of kitchen help. Though after peeling and ricing (gives the best texture, so worth it) 10 pounds of potatoes the night before, I learned how to finally use my ricer properly, it's a bit of a struggle if you overstuff it.

Vegan Papas Rellenas
Makes about 1½ dozen

For the dough:
5 pounds russet potatoes
½ cup cornstarch
1 teaspoon salt
fresh ground pepper

For the filling:
olive oil for sautéing
1 large onion, diced
4 cloves garlic
½ chili pepper
1 teaspoon ground cumin
½ teaspoon sweet paprika
1 cup cremini mushrooms, small dice
2 cups cooked cooked beans
½ cup raisins, soaked in 1 cup boiling water for 10 minutes, then minced
1 handful kale, roughly chopped
1 cup cooked quinoa
¼ cup white wine
Salt and pepper to taste

For the final preparation:
1 tablespoon ground flax seed
3 tablespoons water
1 cup all-purpose flour
Dash cayenne pepper
Dash salt
1 cup bread crumbs

Canola oil for frying

For the dough:

1. Boil unpeeled potatoes whole until tender when stuck with a fork. Let potatoes cool.
2. When potatoes are cooled, peel them and either mash them with a potato masher or force them through a potato ricer.
3. Add cornstarch, salt and pepper and knead “dough” thoroughly to ensure that ingredients are well combined and uniformly distributed.

While potatoes are cooling, make filling:

1. Cook onions in olive oil for about 5 minutes, until soft.
2. Add the garlic and chili pepper and cook several minutes more.
3. Add the cumin and paprika and cook briefly.
4. Add the mushrooms and cook until soft.
5. Add beans and raisins.
6. Deglaze the pan with white wine. Add kale and wilt.
7. Add the quinoa and season with salt and pepper.
8. Allow filling to cool before forming “papas.”

Finishing the dough and forming the papas:

1. Using a food processor or blender, emulsify the ground flax seed with the water. Allow the mixture to stand for a few minutes before using.
2.Use three small bowls (or other shallow containers) to prepare the papas. In one, combine flour, cayenne and salt. In the second, combine the flax seed emulsification and a bit more water to thin the solution. Put bread crumbs in the third
2. Flour your hands and scoop up a fistful of the dough about the size of a baseball. Make a round pancake with your hands. Then make a slight indentation in the middle for the filling.
3. Spoon a generous amount of filling into the center and then roll the potato closed, forming a smooth, potato-shaped casing around the filling. Repeat will all dough.
4. Heat 1½ - 2 inches of oil in a pan to about 350 – 375° F.
5. Dip each papa in the three bowls to coat: first roll in flour, then dip in flax seed emulsion, then roll in bread crumbs.
6. Fry the papas in batches about 2-3 minutes until golden brown. Flip once in the middle of frying to get both sides.
7. Drain on paper towel and store in a cool oven 200°F until ready to serve.
8. Serve with salsa criolla (see recipe below) and your favorite hot sauce.

Salsa Criolla

2 medium red onions, cut in half length-wise and very thinly slice.
1/2 chili pepper
1 tablespoon vinegar
Juice from 1 lime
Salt and pepper to taste

1. Soak the onions in cold salt water for about 10 minutes to remove bitterness. Drain.
2. In a medium bowl, combine the onions with the rest of the ingredients, season with salt and pepper.
3. Cover and refrigerate for at least 30 minutes for the onions to macerate and the flavors to combine.

Kathlyn of Bake Like a Ninja was our Daring Cooks’ March 2011 hostess. Kathlyn challenges us to make two classic Peruvian dishes: Ceviche de Pescado from “Peruvian Cooking – Basic Recipes” by Annik Franco Barreau. And Papas Rellenas adapted from a home recipe by Kathlyn’s Spanish teacher, Mayra.

Sunday, February 27, 2011

Vanilla Panna Cotta with Kumquat Gelée

The first time I had panna cotta was this summer when in Norway. Expressly for the purpose of tasting reindeer carpaccio, I ate at a restaurant that claimed to have an authentic Norwegian menu. As a bonus for the total local experience, the dessert menu listed a panna cotta topped with cloudberries. Panna cotta, is by no means Nordic, but I was more interested in eating those cloudberries. The guide book made them sound rare and special. As a maker of jam I was intrigued. The name alone connotes loftiness!

The cloudberries, served as a pretty amber-colored glaze on top the panna cotta, were nice. Distictly tart. They made for a good pairing with the creamy panna cotta, resulting overall in a light and refreshing summer-y end to a meal.

For those that don't know, panna cotta is honey-sweetened cream and milk, stabilized with unflavored gelatin. Though cream-based, it's really only a fancy Jell-O of sorts, that's very simple to make. In my version here, I top it with a season-approapriate, citrusy and spiced kumquat gelée, which also has a jello-like consistency due to the addition of gelatin. With the free-floating fruit, it is perhaps somewhat reminiscent of the Jell-O salad ubiquitous at retro potlucks. But I'd like to believe this is a slightly more sophisticated version.

The February 2011 Daring Bakers’ challenge was hosted by Mallory from A Sofa in the Kitchen. She chose to challenge everyone to make Panna Cotta from a Giada De Laurentiis recipe and Nestle Florentine Cookies. I attempted the florentine cookies as well, but gave them all away before photos could be taken.

Giada's Vanilla Panna Cotta
serves 6

1 cup whole milk
1 TBS (one packet) unflavored powdered gelatin
3 cups whipping cream (30+% butterfat)
1/3 cup honey
1 TBS granulated sugar
pinch of salt

Pour the milk into a chilled sauce pan and sprinkle gelatin evenly and thinly over the milk. Let stand for 5 minutes to soften the gelatin.
Place the saucepan over medium heat on the stove. Heat this mixture until it is hot, but not boiling, about five minutes, whisking a few times as it heats.
Next, add the cream, honey, sugar, and pinch of salt. Making sure the mixture doesn't boil, continue to heat and stir occasionally until the sugar and honey have dissolved, 5-7 minutes.
Remove from heat, allow it to sit for a few minutes to cool slightly. Then pour into individual glasses or ramekins.

Refrigerate about 6 hours or until firm. When firm enough to support the gelée layer (see recipe below), pour the room temperature gelée over the panna cotta, distributing evenly among all the glasses. Room temperature is important so as not to melt the panna cotta, which would disturb the distinct separation of layers. Chill several more hours to allow the gel to set up firm.

Kumquat Gewurztraminer Gelée
from Jamie Stachowski, Restaurant Kolumbia

1 pint kumquats
1½ tsp powdered gelatin
1¼ cup Gewurztraminer wine, divided
½ cup sugar
½ cup honey
1 small knob peeled ginger root
1 star anise clove
zest of ½ a lemon
1½ tsp lemon juice
a pinch of salt

In a saucepan, cover the whole kumquats with water and bring to a boil. Reduce to simmer for 2 minutes, then drain. Repeat process twice until kumquats are very soft, don't worry if some begin to split. This process removes the bitterness. Slice into thin rounds and remove seeds. Set aside.

In a bowl, sprinkle the gelatin over ¼ cup wine. Set aside.

Set a pot over medium heat and mix the sugar with the honey. When the sugar dissolves, turn heat to low and add the ginger, anise clove, and lemon zest. Simmer for a few minutes until aromatic. Stir in the remaining cup of wine, then add sliced kumquats and simmer on low until the flesh is tender, about 5 to 7 minutes. Remove from heat. Take ¼ cup of syrup and whisk into gelatin/wine mixture, then stir the gelatin mixture back into pot of kumquats and syrup. Add the lemon juice and a pinch of salt. Stir to evenly distribute kumquats and whole spices. Cool until room temperature and then remove spices.

Monday, February 14, 2011

Hiyashi Soba and Vegetable Tempura

Interested in learning to cook Japanese food? Then I suggest watching some of the entertaining how-to videos made by Kumigar. She's an adorable, young Japanese woman, who posts self-produced clips of cooking demos on YouTube. Her enthusiasm for food, both cooking and eating, is quite apparent. It's reassuring to see that sort of honest and unabashed fervor in someone other than myself!

Along the way in preparing the recipes below, I learned a very helpful tip to prevent stove top spillovers. Pots boiling over are something for which I'm notorious, and it's even more of nuisance now that I have a flat-surfaced, glass-top stove. There's no burner pan to collect the run-off drainage. I learned to temper an overflowing boil with a cup of cold water (see cooking intructions for udon below for more details). Of course this takes careful attention on the pot (which is key to preventing all kitchen disasters in the first place).

The February 2011 Daring Cooks’ challenge was hosted by Lisa of Blueberry Girl. She challenged Daring Cooks to make Hiyashi Soba and Tempura. She has various sources for her challenge including japanesefood.about.com, pinkbites.com, and itsybitsyfoodies.com.


Hiyashi Soba
serves 4

Soba Noodles:

2 quarts water + 3 cups cold water, separate
12 oz dried soba noodles

Heat 2 quarts of water to a boil in a large pot over high heat. Add the noodles a small bundle at a time, stirring gently to separate. When the water returns to a full boil, add 1 cup of cold water. Repeat this twice. When the water returns to a full boil, check the noodles for doneness. You want to cook them until they are firm-tender. Do not overcook them.

Drain the noodles in a colander and rinse well under cold running water until the noodles are cool. This not only stops the cooking process, but also removes the starch from the noodles. This is an essential part of soba noodle making. Once the noodles are cool, drain them and cover them with a damp kitchen towel and set them aside allowing them to cool completely.

Mentsuyu - Traditional dipping sauce:

2 cups Kombu and Katsuobushi dashi or a basic vegetable stock
1/3 cup shoyu soy sauce
1/3 cup mirin

Put mirin in a sauce pan and heat gently. Add soy sauce and dashi soup stock in the pan and bring to a boil. Take off the heat and cool. Refrigerate until ready to use.

Spicy Dipping Sauce:

¾ cup green onions, finely chopped
3 tablespoons shoyu soy sauce
2 tablespoons rice vinegar
½ teaspoon granulated sugar
¼ teaspoon English mustard powder
1 tablespoon vegetable oil
1 tablespoon sesame oil
Sea salt and freshly ground black pepper to taste - roughly 1/3 a teaspoon of each


Shake all the ingredients together in a covered container. Once the salt has dissolved, stir in 2 tablespoons of water and season again if needed.

Tempura
serves 4

1 egg yolk from a large egg
1 cup iced water
½ cup all-purpose flour, plus extra for dredging
½ cup cornstarch
½ teaspoon baking powder
oil, for deep frying preferably vegetable
ice water bath, for the tempura batter

Very cold vegetables that I used include:

Sweet potato, peeled, thinly sliced, blanched
Fingerling potato, peeled, thinly sliced, blanched
Broccoli florets, blanched
Cauliflower florets, blanched
Fresh mushrooms
Onions sliced


Place the iced water into a mixing bowl. Lightly beat the egg yolk and gradually pour into the iced water, stirring and blending well. Add flours and baking powder all at once, stroke a few times with chopsticks until the ingredients are loosely combined. The batter should be runny and lumpy. Place the bowl of batter in an ice water bath to keep it cold while you are frying the tempura. The batter as well as the vegetables have to be very cold. The temperature shock between the hot oil and the cold veggies help create a crispy tempura.

Heat the oil in a large pan or a wok. For vegetables, the oil should be 320°F.

Dip the prepared vegetables in a shallow bowl of flour to lightly coat them and then dip them into the batter. Slide them into the hot oil, deep frying only a couple of pieces at a time so that the temperature of the oil does not drop.

Place finished tempura pieces on a wire rack so that excess oil can drip off.

Serve immediately for the best flavor, but they can also be eaten cold.

Sunday, January 30, 2011

Matcha-Hazelnut Sponge with Lemon Curd & Matcha Marzipan Flowers

The January 2011 Daring Bakers’ challenge was hosted by Astheroshe of the blog accro. She chose to challenge everyone to make a Biscuit Joconde Imprime to wrap around an Entremets dessert.

A joconde imprime (French Baking term) is a decorative design baked into a light sponge cake providing an elegant finish to desserts/torts/entremets/ formed in ring molds. A joconde batter is used because it bakes into a moist, flexible cake. The cake batter can be tinted or marbleized for a further decorative effect.

Entremets (another French baking term) is an ornate dessert with many different layers of cake and pastry creams in a mold, usually served cold, much like a trifle but molded to be free-standing versus layered in a glass bowl.

All seems intimidating, but if you work through the layers in stages, it's really not that big of deal. I sketched out a plan in advance. The idea for mine started with wanting to use up some "leftovers" in my "pastry" fridge. Believe it or not I had on hand fresh lemon curd (recently made to use up 8 extra yolks), homemade marzipan (a gift I was working on for my dad), matcha tea (from my good friends at Arbor Teas), hazelnut meal (a bag that seems perpetually full no matter how much has been scooped from it), and crystalized lilacs (maybe only a dozen left from the original batch of 200).

I wasn't sure if the flavors of the dessert I was crafting in my head would meld well, but I was excited for the vibrant colors--a bolt of the tropics smack in the middle of a snowy and frigid winter. Since this dessert needed to travel to a weekend brunch, I took the safe route and layered them in juice glasses like a trifle. A true entremet with joconde is free-standing. Nonetheless, now having tasted the finished dessert, I can say yes, green tea, lemon, hazelnut, almond, butter and sugar all seem to work nicely together to put a warm smile in your belly.

Joconde Sponge

This Joconde/spongecake requires attentive baking so that it remains flexible to easily conform to the molds. If under baked it will stick to the baking mat. It over baked it will dry out and crack. Once cooled, the sponge may be cut into strips to line any shape ring mold.

YIELD: Two ½ size sheet pans or a 13” x 18” jelly roll pan

Ingredients:
3 large egg whites (90g)
2½ teaspoons (10g) white granulated sugar
¾ cup (85g) almond flour/or hazelnut meal - *omit the butter if using hazelnut
½ cup plus 2 tablespoons (75g) confectioners' sugar
¼ cup (25g) cake flour
3 large eggs (150g)
2 tablespoons (30g) unsalted butter, melted

Directions:

In a clean mixing bowl whip the egg whites and white granulated sugar to firm, glossy peeks. Reserve in a separate clean bowl to use later.

Sift almond flour, confectioner’s sugar, cake flour into the just emptied mixing bowl, no need to wash out egg whites.) On medium speed with the paddle attachment, add the eggs a little at a time. Mix well after each addition. Mix until smooth and light.

Fold in one third reserved whipped egg whites to almond mixture to lighten the batter. Fold in remaining whipped egg whites. Do not over mix. Fold in melted butter, if using.

Reserve batter to be used later.

Patterned Joconde-Décor Paste

YIELD: Two ½ size sheet pans or a 13” x 18” jelly roll pan

Ingredients:
14 tablespoons (200g) unsalted butter, softened
1½ cups plus 1½ tablespoons (200g) Confectioners' sugar
7 large egg whites (200g)
1¾ cup (220g) cake flour

Food coloring gel, paste or liquid (optional)

COCOA or MATCHA Décor Paste Variation: Reduce cake flour to (170g). Add (60 g) cocoa powder or Matcha green tea. Sift the flour and cocoa powder together before adding to creamed mixture.

Directions:

Cream butter and sugar until light and fluffy. Gradually add egg whites. Beat continuously until emulsified. Fold in sifted flour. Tint batter with coloring to desired color, if not making cocoa or matcha variation.

Preparing the Joconde- How to make the pattern:

Spread a thin even layer of décor paste approximately 1/4 inch thick onto silicone baking mat with a spatula, or flat knife. Place mat on an upside down baking sheet. The upside down sheet makes spreading easier with no lip from the pan.

Pattern the décor paste – Here is where you can be creative. Make horizontal /vertical lines (you can use a knife, spatula, cake/pastry comb). Squiggles with your fingers, zig zags, wood grains. Be creative whatever you have at home to make a design can be used. OR use a piping bag. Pipe letters, or polka dots, or a piped design. If you do not have a piping bag. Fill a ziplock bag and snip off corner for a homemade version of one.

Slide the baking sheet with paste into the freezer. Freeze hard. Approx 15 minutes.


Remove from freezer. Quickly pour the Joconde batter over the design. Spread evenly to completely cover the pattern of the Décor paste.

Bake at 475ºF until the joconde bounces back when slightly pressed, approx. 8-15 minutes. You can bake it as is on the upside down pan. This is a very quick bake, so watch carefully.

Cool briefly. Do not leave too long, or you will have difficulty removing it from mat.

Flip cooled cake on to a powdered sugared parchment paper. Remove silpat. Cake should be right side up, and pattern showing! (The powdered sugar helps the cake from sticking when cutting.)

Preparing the Jaconde for Molding:

Trim the cake of any dark crispy edges. You should have a nice rectangle shape.

Decide how thick you want your “Joconde wrapper”. Traditionally, it is ½ the height of your mold. This is done so more layers of the plated dessert can be shown. However, you can make it the full height.

Once your height is measured, then you can cut the cake into equal strips, of height and length. (Use a very sharp paring knife and ruler.)

Make sure your strips are cut cleanly and ends are cut perfectly straight. Press the cake strips inside of the mold, decorative side facing out. Once wrapped inside the mold, overlap your ends slightly. You want your Joconde to fit very tightly pressed up to the sides of the mold. Then gently push and press the ends to meet together to make a seamless cake. The cake is very flexible so you can push it into place. You can use more than one piece to “wrap" your mold, if one cut piece is not long enough.

The mold is done, and ready to fill.

Entremet- Filling:

Lemon Curd
makes 1 full cup

4 large egg yolks
1/2 cup plus 2 TBS sugar
3 fl oz freshly squeezed lemon juice
4 TBS, unsalted butter softened
pinch of salt
2 tsp finely shredded lemon zest

In a heavy, non-corrosive saucepan whisk the yolks and sugar until well blended. Stir in the remaining ingredients except the lemon zest. Cook over medium-low heat, stirring constantly, until thickened and thickly coats the back of a wooden spoon and reaches 170 F. Do not allow it to boil or it will curdle. Pour immediately through a fine mesh strainer, pressing on any remains with the back of a spoon to extract as much curd as possible. Stir in the lemon zest and cool. Pour into an airtight container and press a piece of plastic to the surface of the curd before sealing. The curd will continue to thicken when refrigerated.

Matcha Marzipan

1 tsp matcha powder
6 TBS marzipan

On a wooden surface, knead matcha into Marzipan until completely incorporated. Roll out to desired thickness to cut shapes or sculpt into character. Keep tightly wrapped in plastic until ready to use, to prevent drying out.

Friday, January 21, 2011

Cultured Tea Butter and Buttermilk

I often contribute recipes to the blog of my friends' tea company, Arbor Teas. Here is the latest recipe I developed using a few of their teas.

2010 seemed to be the year of DIY in the food world, and I have no doubt that 2011 will continue to be the same. If the reasons are not for putting up (canning, curing, dehydrating, etc.) to preserve the abundance of harvest for leaner times like our great grandparents used to or not meant to ease reliance on commercially-packaged, convenience foods, then it's to satiate the curiosity of how basic foodstuffs are produced and to relish in the pure satisfaction that you can DO IT YOURSELF.

Remember taking turns to shake that jar of cream in kindergarten until it thickened and yielded a soft, spreadable butter? Patience-inducing yet awe-inspiring to a 5-year old. Making cultured butter from scratch is just one step up from that sort of classroom demo magic. And using a modern stand mixer makes it an easily approachable task if your kitchen amenities are sans old-fashioned butter churn and butter bats. Furthermore, fresh, liquid cream presents a blank canvas on which you can layer a custom flavor profile at the very foundation, before churning. You can add cultures for tangy-ness as well as ingredients, like tea, that steep best in liquid without altering the final texture. Compound butters, a different approach to flavored butter where herbs, aromatics, syrups or fruit pastes are mashed into solid butter, while good in there own right, offer only the opportunity for flavor afterthoughts, post-churning.

So in the spirit of DIY, I present you below with directions for culturing butter and flavoring it using Arbor Teas' oraganic, loose-leaf tea. Cultured tea butter should not be confused with Tibetan butter tea, a yak milk-derived, fortifying hot beverage for the iron-stomached. This is a wholly different dining experience. I chose two very different Arbor Teas to make two unique flavors. The first was organic genmaicha green tea, which is composed of Japanese green tea leaves mixed with toasted brown rice kernels. This tea flavor brings to mind popcorn, and thus lightly salted butter flavored with genmaicha lends itself to savory applications: smeared on crusty bread or slathered on roasted vegetables. The second was organic masala chai tea. Redolent with warm spice and delicately sweetened (post-churn) with honey, this makes a welcome addition to a breakfast table spread or to afternoon tea fare.
As a premium for churning your own butter, you will also produce a good amount of deliciously drinkable, tea-flavored buttermilk. I used the excess to make the tiny corn biscuits pictured above. They were a perfect vehicle to deliver taste tests of homemade tea butter (either sweet or savory) to friends. A note of caution, though, before proceeding: you may start consuming more butter than you ever thought necessary. It's that good!

Cultured Tea Butter and Buttermilk
makes about a ½-pound of butter and about 1 cup buttermilk

2 TBS organic loose tea leaves
2 cups heavy cream (the best quality you can find: highest butterfat, least pasteurized)
2 heaping TBS plain whole-milk yogurt, crème fraîche or buttermilk (be sure these do not contain any additive gums or stabilizers)

ice

⅛ - ¼ tsp flaky sea salt
1 TBS (or more to taste) honey (optional)

Make a tea sachet by packing the loose tea leaves in a tea sac or other type of disposable filter and tying securely with kitchen twine. Place the tea sachet in a clean glass mason jar. Pour the heavy cream and yogurt over the tea. Stir to combine. Cover loosely and place it in a warmish part of the house - the ideal temperature is around 75° F, but anywhere in the range from 70-80° F will work.

After 12-18 hours, the cream should be noticeably thicker and should taste slightly tangy. If it hasn't thickened yet, leave it alone for another few hours and eventually it will. When your cream has thickened, remove the tea sachet and scrape off any thickened cream that may adhere to the filter, adding this back to the cream. If you are not ready to make your butter right away, transfer the container to the fridge where you can leave it for up to another 24 hours.

When ready to churn the cream, remove it from the fridge and allow it to stand at room temperature until it reaches about 60° F. If you're making it from room temperature you'll need to place the bowl in a bath of ice water for a few minutes to cool it down.

Fill another large bowl with water and ice cubes and set this aside.

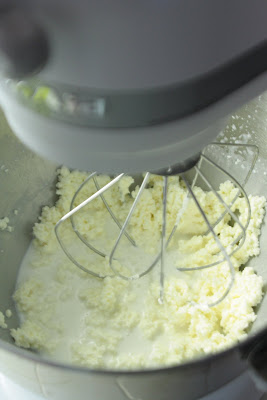
Pour the cream into the bowl of a stand mixer and beat at high speed using the whisk attachment. A hand-held electric beater or even whisking vigorously by hand will also work. When the cream starts to form stiff peaks (see picture below at left), reduce the speed to low. Watch carefully, first the peaks will start to look grainy, and a few seconds later the cream will break. When it does, clumps of pale yellow butterfat will form leaving a pool of buttermilk in the bowl (see picture below at right). Stop beating. Carefully strain the bowl over a cup to drain away as much buttermilk as possible. Reserve the buttermilk for another use.


Next the butter must be washed with ice water to remove any residual buttermilk, which could cause the butter to spoil prematurely. If using a stand mixer, switch the whisk attachment for the dough hook. If you don't have a stand mixer, a fork or a stiff rubber spatula will do. Pour some of the reserved ice water over the butter, kneading it vigorously. The water will turn cloudy and the butter will seize up, making it cohere and knead more easily (see before and after pictures below). Pour out the liquid and repeat as many times as needed (about 3-4 times) until the rinse water in the bowl is completely clear. After the last of the rinse water has been poured off, continue kneading for a few more minutes to get as much water as possible out of the butter. Pour off any residual liquid. Add the salt (and honey, if using) now and continue to knead until completely incorporated.


Pack the cultured tea butter into ramekins or shallow jelly jars, roll it in parchment paper, or use it to fill shaped molds before covering tightly and refrigerating. Place in the freezer for longer term storage.

Monday, January 17, 2011

Using up the Last of the T-giving Turkey in a Faux Cassoulet

Well, almost two months later, I finally did it. I finished my turkey leftovers from Thanksgiving. Yes, that took awhile! I had proudly cooked a large (15.7-pound) bird for a small group. Guests were sent home with leftovers and a stock was made and some was repurposed into meals the days following the big dinner and still plenty was left to freeze! Now that it's gone, it's safe to assume that I'm not gonna want to eat turkey again anytime soon. Not gonna want to eat any meat for awhile, actually. I'm ready for a post-holiday cleanse...


And when I finish the last of the multitude of winter squash and potatoes still left from my CSA, I'll probably want a cleanse from orange or starchy vegetables, too...


Just as I was deciding this, the Daring Kitchen challenged me to make a confit to use for a classic preparation of a traditional French cassoulet. Do you know what that means? Typically confit refers to meat that is seasoned and slowly cooked submerged in its own rendered fat. An interesting food preservation technique that I do want to learn, but, um, not very cleansing.

I took the veg option, which meant cooking vegetables with a good glug of olive oil before adding in the stock and other various ingredients to make it a stew of sorts. And then I deleted its vegetarian label by stirring in the last of the shredded turkey. The finishing accent was a crumble of garlicky toasted breadcrumbs. It's a fine cold-weather soup and a practical solution for turkey excess. Maybe after a few months of virtuous eating have passed, I'll be ready to approach the confit...

Turkey and Veg Cassoulet
adapted from Vegetarian Cassoulet by Gourmet Magazine, March 2008
serves 10-12


Ingredients:
3 medium leeks (white and pale green parts only)
¾ lbs carrots, halved lengthwise and roughly diced
1½ lb butternut squash, peeled, seeded and roughly diced
4 garlic cloves, chopped
¼ cup olive oil
4 thyme sprigs
2 oregano sprigs
1 bay leaf
⅛ tsp ground cloves
½ tsp salt
½ tsp fresh group pepper
4 cups cooked snow cap beans, reserve about a half cup to mash to thicken the soup, reserve the pot liquor (cooking liquid)
28-oz can fire-roasted tomatoes, roughly chopped, reserve juices
about 2 cups shredded, cooked turkey
1 qt turkey stock
1 bunch kale, center ribs removed and roughly chopped

Bread Crumb Topping
4 cups coarse fresh bread crumbs from a baguette
⅓ cup olive oil
1 tablespoon chopped garlic
1 TBS chopped parsley
¼ tsp salt
¼ tsp freshly ground pepper

Directions:
1. Halve leeks lengthwise and cut crosswise into ½-inch pieces, then wash well by swirling in a deep bowl of cold water. Allow the dirt to fall to the bottom of the bowl. Skim off clean leeks from the water surface being careful not to disturb the silt that collected at the bottom of the bowl.
2. Cook leeks, carrots, butternut squash, and garlic in oil with herb sprigs, bay leaf, cloves, salt and pepper in a large heavy pot over medium heat, stirring occasionally, until softened, about 15 minutes. Stir in beans (both whole and mashed) and its pot liquor, tomatoes and their juices, shredded turkey and stock. Stir in the kale. Simmer, partially covered, stirring occasionally, until kale is wilted and carrots are tender but not falling apart, about 30 minutes.
3. Preheat oven to 350°F with rack in middle.
4. Toss bread crumbs with oil, garlic, parsley, salt and pepper in a bowl until well coated.
5. Spread in a baking pan and toast in oven, stirring once halfway through, until crisp and golden, 12 to 15 minutes.
6. Cool crumbs in pan.
7. Discard herb sprigs and bay leaf.
8. Season with salt and pepper. Just before serving, sprinkle with garlic crumbs.


Our January 2011 Challenge comes from Jenni of The Gingered Whisk and Lisa from Parsley, Sage, Desserts and Line Drives. They have challenged the Daring Cooks to learn how to make a confit and use it within the traditional French dish of Cassoulet. They have chosen a traditional recipe from Anthony Bourdain and Michael Ruhlman.

Monday, December 27, 2010

Christmas Wreath Stollen

I told a few people I was making stollen. Their first response: "Have you ever had fill-in-the-blank's stollen?!!" Me: "Um, no. I didn't think I liked stollen, and so-and-so's is kinda pricey. I'm just making it for my baking challenge. I figured I'd send it to my Ome."

I didn't realize so many places in town sold it or that it had a bit of an exuberant following. The adult me was relying on the kid me's experiences of not liking the sorta dry and strangely fruity, rum-scented bread. I wasn't that excited to make it, so I was looking at this as an opportunity to hone my bread making skills, which need some work.

Since I've moved, getting yeasted doughs to rise has been a challenge. I was wanting more recipes to troubleshoot warm, non-drafty proofing zones, to figure out if my stash of instant yeast I've been storing in my fridge for several years was still viable, and to learn the cues of achieving a springy, well-kneaded dough.

To my relief this bread came together perfectly thanks to thorough directions, finding an ideal proofing spot in my oven, and using brand new packet yeast instead of the old instant stuff. I'm still learning the trick of kneading and adding appropriate amounts of flour so things don't stick to my hands. Right now, I still rely on my stand mixer and dough hook to do the messy, hard work. But success with this has given me a little more confidence to try more bread projects.

In my opinion this stollen is best eaten within a day or so that it is made. But I suppose it would still be good toasted several days after. Mine didn't last long enough to find out... After eating two good-sized portions on my own, I sectioned off the rest and packaged them to give as gifts to neighbors, coworkers and family. It was studded with Grand Marnier-soaked cherries and candied blood orange peels and limequats. Yes, limequats! Apparently kumquats are being hybridized with other fruits. My grocer had already sold out of mandarinquats. I'm hoping they'll be restocked soon. I think a medley of kumquat hybrids would make a lovely marmalade!

The 2010 December Daring Bakers’ challenge was hosted by Penny of Sweet Sadie’s Baking. She chose to challenge Daring Bakers’ to make Stollen. She adapted a friend’s family recipe and combined it with information from friends, techniques from Peter Reinhart’s book.........and Martha Stewart’s


Stollen Wreath

Makes one large wreath or two traditional shaped Stollen loaves. Serves 10-12 people

¼ cup lukewarm water (110º F)
2 packages active dry yeast
1 cup milk
10 TBS unsalted butter
5½ cups (770 grams) all-purpose flour
½ cup (115 gms) sugar
¾ tsp kosher salt
1 tsp cinnamon
3 large eggs, lightly beaten
Grated zest of 1 lemon and 1 orange
2 tsp vanilla extract
1 tsp rum extract
¾ cup mixed candied citrus peel (here's a link to make your own) I used blood oranges and limequats this time
1 cup firmly packed unsweetened dried cherries
3 TBS Grand Marnier
1 cup flaked almonds
Melted unsalted butter for coating the wreath
Confectioners’ sugar for dusting wreath

Directions:
In a small bowl, soak the cherries in the Grand Marnier and set aside.

To make the dough:
Pour ¼ cup warm water into a small bowl, sprinkle with yeast and let stand 5 minutes. Stir to dissolve yeast completely.

In a small saucepan, combine 1 cup milk and 10 tablespoons butter over medium - low heat until butter is melted. Let stand until lukewarm, about 5 minutes.

Lightly beat eggs in a small bowl and add the vanilla and rum extracts.

In a large mixing bowl, stir together the flour, sugar, salt, cinnamon, orange and lemon zests.

Then stir in the yeast/water mixture, eggs and the lukewarm milk/butter mixture. This should take about 2 minutes. It should be a soft, but not sticky ball. When the dough comes together, cover the bowl with either plastic or a tea cloth and let rest for 10 minutes.

Add in the candied citrus peel, soaked cherries and almonds and mix with your hands or on low speed in the stand mixer to incorporate.

Sprinkle flour on the counter, transfer the dough to the counter, and begin kneading (or mixing with the dough hook) to distribute the fruit evenly, adding additional flour if needed. The dough should be soft and satiny, tacky but not sticky. Knead for approximately 8 minutes (6 minutes by machine). The full six minutes of kneading is needed to distribute the dried fruit and other ingredients and to make the dough have a reasonable bread-dough consistency. You can tell when the dough is kneaded enough – a few cherries will start to fall off the dough onto the counter because at the beginning of the kneading process the dough is very sticky and the cherries will be held into the dough but when the dough is done it is tacky which isn't enough to bind the outside cherries onto the dough ball.

Lightly oil a large bowl and transfer the dough to the bowl, rolling around to coat it with the oil. Cover the bowl with plastic wrap. Put it in the fridge overnight. The dough becomes very firm in the fridge (since the butter goes firm) but it does rise slowly. The raw dough can be kept in the refrigerator up to a week and then baked on the day you want.

Shaping the dough and baking the wreath:
Let the dough rest for 2 hours after taking out of the fridge in order to warm slightly. Line a sheet pan with parchment paper.

Punch dough down, roll into a rectangle about 16 x 24 inches and ¼-inch thick. Starting with a long side, roll up tightly, forming a long, thin cylinder.

Transfer the cylinder roll to the sheet pan. Join the ends together, trying to overlap the layers to make the seam stronger and pinch with your fingers to make it stick, forming a large circle. You can form it around a bowl to keep the shape.

Using kitchen scissors, make cuts along outside of circle, in 2-inch intervals, cutting 2/3 of the way through the dough. Twist each segment outward, forming a wreath shape. Mist the dough with spray oil and cover loosely with plastic wrap. Proof for approximately 2 hours at room temperature, or until about 1½ times its original size.

Preheat oven to 350°F with the oven rack on the middle shelf. Bake the stollen for 20 minutes, then rotate the pan 180 degrees for even baking and continue to bake for 20 to 30 minutes. The bread will bake to a dark mahogany color, should register 190°F in the center of the loaf, and should sound hollow when thumped on the bottom.

Transfer to a cooling rack and brush the top with melted butter while still hot. Immediately tap a layer of powdered sugar over the top through a sieve or sifter. Wait for 1 minute, then repeat with another layer of butter and sifted sugar over the first. Wait a minute and then coat with butter and sugar for a final time. The bread should be coated generously with the powdered sugar.

Let cool at least an hour before serving. When completely cool, store in a plastic bag. Or leave it out uncovered overnight to dry out slightly, German style.

The stollen tastes even better in a couple of days and it toasts superbly.

Storage
The more rum and the more coatings of butter and sugar you use the longer it will store. Stollen freezes beautifully about 4 months, stores well for 2 weeks covered in foil and plastic wrap on the counter at room temperature, or for one month in the refrigerator well covered with foil and plastic wrap.